Historically with C and C++ compilers, you get what you get and you don’t get upset. There was little or no facility for extending the compiler or for the kind of meta-programming models available in other languages. Macro or template meta-programming and source code generation has been an option for many, many years but annotation based meta-programming which is a prominent feature of many popular Java frameworks has been very difficult to replicate in C++.
Starting with version 4.5.0, the GCC compiler supports ‘plugins’ which are dynamically loaded modules which make it possible for developers to enrich the compiler without having to modify the GCC source code itself. There is a bit of information on the GCC Wiki and an excellent set of articles by Boris Kolpackov on the basics of writing GCC plugins. Beyond those references, I found little else. I spent a lot of time digging through GCC header files and using trial-and-error to work through decoding the GCC internal data structures.
Starting with GCC version 4.8.0, the compiler supports the C++ 11 standard for ‘generalized attributes’. GCC (and many other C/C++ compilers) have had attributes for quite some time, but C++ 11 now specifies a standard syntax for both attributes and attribute namespaces.
Taken together, plugins and C++ 11 generalized attributes provide a framework within which annotation based meta-programming may be approached in the GCC compiler. To be clear, it is not necessarily easy to do – there is a long learning curve for GCC internals – but at least it is achievable without requiring pragmas, code generators or direct modification of the GCC compiler itself.
In this and a series of followup posts, I’ll walk through creating a GCC plugin, adding custom attributes, decoding and traversing the Abstract Syntax Tree (AST) and simple modifications to the AST.
C++11 Generalized Attributes
The GCC compiler has had attributes for quite some time, primarily to provide hints to the compiler or for injecting debugging code. The GCC syntax appears below:
__attribute__ ((aligned (16)))
Contrast the above with the equivalent C++ 11 syntax:
[[gnu::aligned (16)]]
In the C++ specification, the __attribute__ keyword is gone and double brackets are used to surround the attribute. Also, the new specification introduces namespaces for attributes. In the above example, the ‘gnu’ namespace is implicit in the GCC style attribute but must be called out explicitly when using the C++ standard syntax.
Development Environment
In general, I start by creating a VM for the project I will be working on – essentially one VM per project. In a series of prior posts I walk through creating an Ubuntu development VM, the process required to build a debug version of GCC and how to debug GCC in the Eclipse CDT IDE. The rest of this post assumes that base environment but there is no reason why the process presented herein could not be modified for a different but functionally similar environment.
For generalized attributes, you will need GCC version 4.8.0 or later.
Creating a GCC Plugin
Step 1: Create a pair of C++ Projects in Eclipse CDT
Perhaps the most straightforward way to build and debug a plugin in Eclipse is to create one C++ project for the plugin itself and a second ‘dummy’ C++ project which is used to hold the source files to be compiled by a debug instance of GCC with the plugin loaded. Figure 1 shows the Eclipse Project Explorer window for this simple project. The ‘GCCAttributesAndPlugin’ project should be an empty shared object and a ‘HelloWorld’ executable is fine for the ‘TestProject’.

Figure 1: Two C++ Projects in Eclipse Explorer
Step 2: Modify the Compiler Settings for the Plugin Project
A small number of modifications to the plugin project C++ compiler settings are necessary to insure the correct version of the compiler is used and the plugin header files are found. Figure 2 contains an image of the Eclipse C++ Settings dialog with the ‘Command’ changed to point to the 4.8.0 version of the g++ compiler built previously. Other changes are found in the ‘All Options’ but those will actually be introduced in the next steps.

Figure 2: C++ Compiler Settings
Next, the include path for the GCC plugin header files needs to be added to the project. For an environment configured per my prior post, the correct path is: ‘/usr/gcc-4.8.0/lib/gcc/x86_64-linux-gnu/4.8.0/plugin/include’ and can be seen in the C++ Settings Includes Dialog in Figure 3.

Figure 3: C++ Settings Include Dialog
Next, a couple of options need top be added to the Miscellaneous dialog as shown in Figure 4. The two that will need to be added to a vanilla project are: ‘-std=c++0x’ to indicate the C++ 11 language specification should be used and ‘-gdwarf-3’ to force the compiler to emit debugging symbols in dwarf-3 format, as the latest version of the gdb debugger will not accept the default compiler dwarf formation.
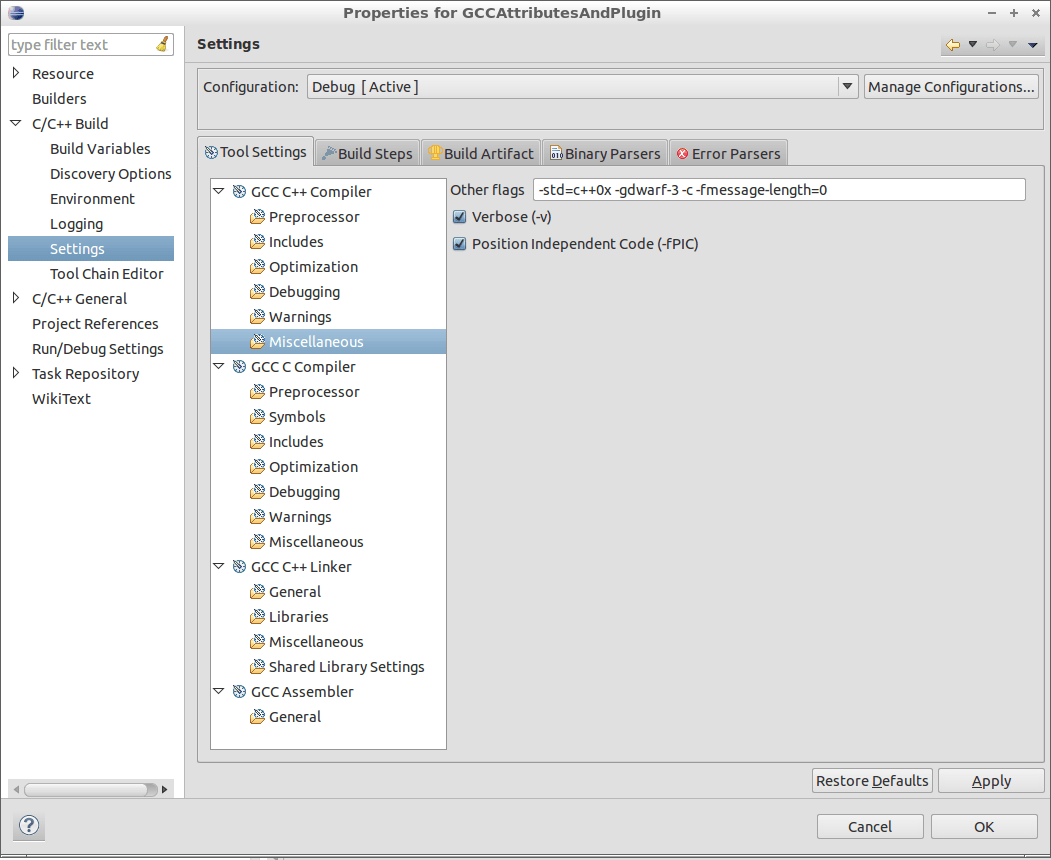
Figure 4: C++ Settings Miscellaneous
Finally, just as the ‘Command’ was changed for the C++ compiler, the same needs to be done for the Linker as shown in Figure 5.
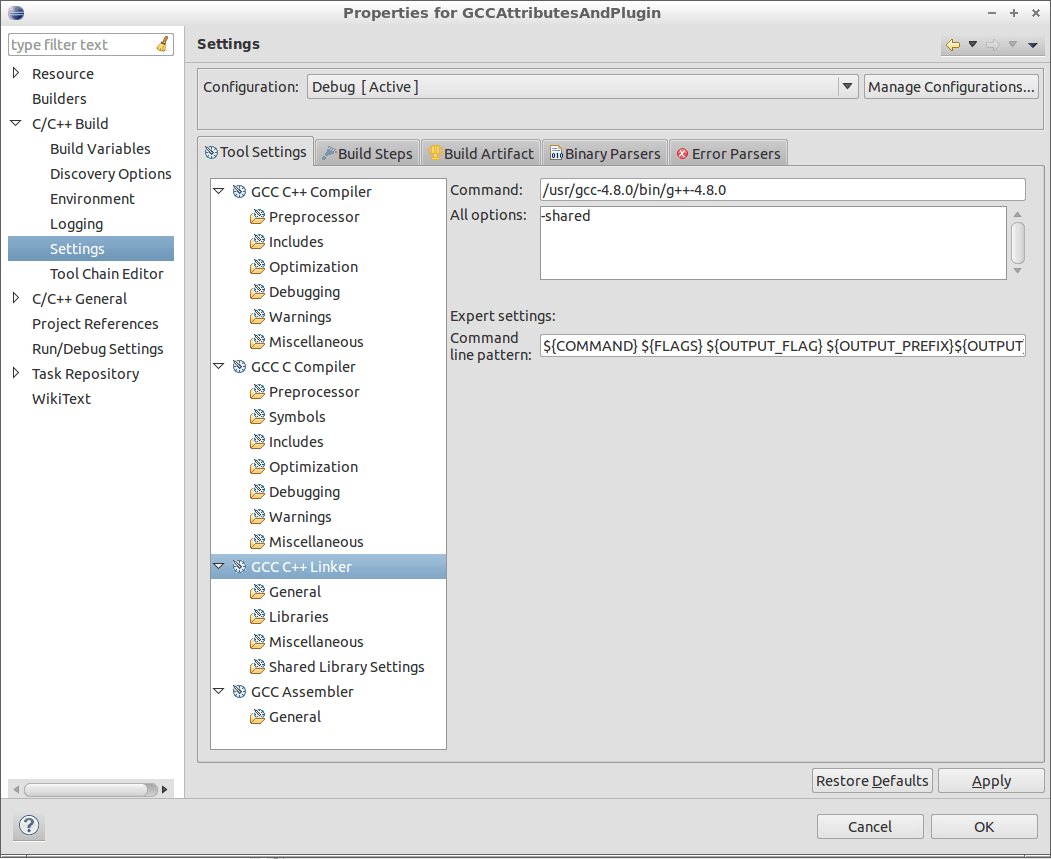
Figure 5: Linker Settings Dialog
Step 3: Modify the Discovery Options for the Plugin Project
To insure that the Eclipse IDE finds the correct include path paths and indexes the project properly, the ‘Discovery Options’ need to be changed to reflect the compiler being used for the project itself. Figure 6 shows the modification to the ‘Compiler Invocation Command’ for the discovery function.
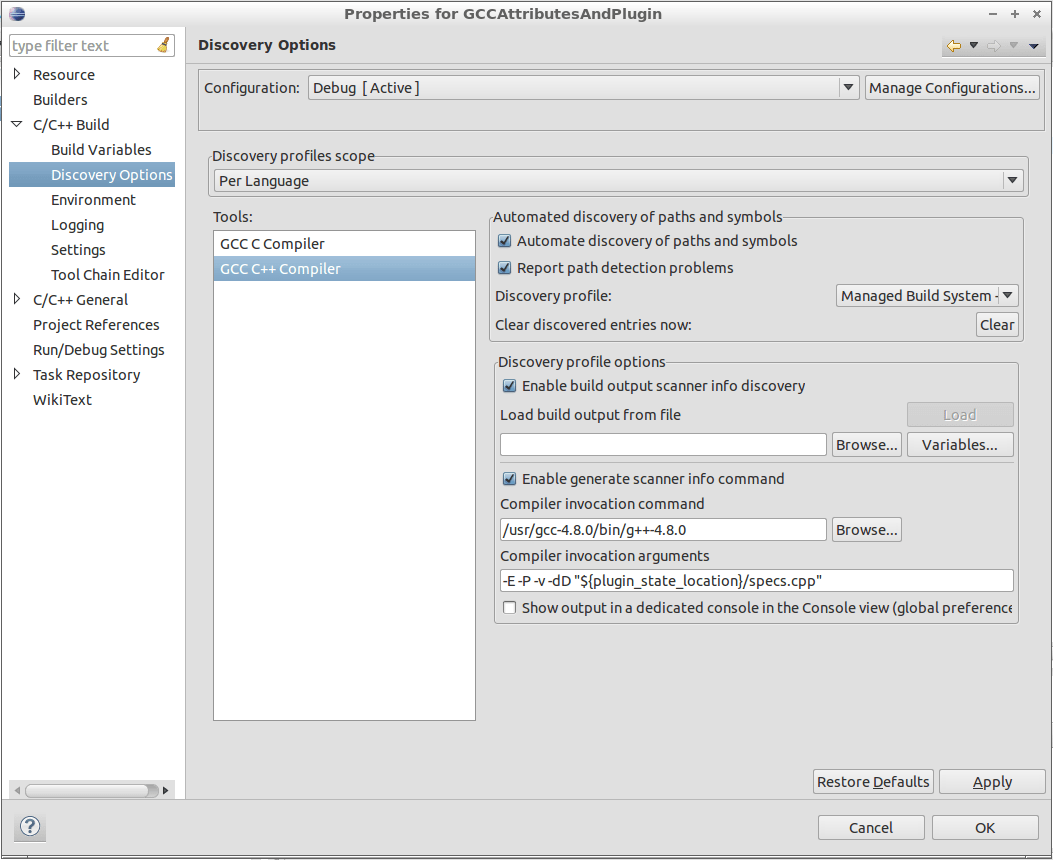
Figure 6: Discovery Options Dialog
Step 4: Source Code for the Plugin
Little source code is required to register custom attributes and build a plugin. The code for a very simple plugin with attributes appears below.
[sourcecode language=”cpp” wraplines=”false” collapse=”false”]
/*
* gccplugin.cpp
*
* Created on: May 17, 2013
* Author: steve
*/
#include <iostream>
#include "config.h"
#include "gcc-plugin.h"
#include "tree.h"
#include "cp/cp-tree.h"
#include "diagnostic.h"
#include "plugin.h"
//
// The following global int is needed to let the compiler know that this plugin is// GPL licensed
//
int plugin_is_GPL_compatible;
static tree HandleAttribute( tree* node,
tree attrName,
tree attrArguments,
int flags,
bool* no_add_attrs )
{
std::cerr << "Encountered Attribute: " << IDENTIFIER_POINTER( attrName );
// Print the arguments
std::string separator = " ";
for( tree& itrArgument = attrArguments; itrArgument != NULL_TREE; itrArgument = TREE_CHAIN( itrArgument ) )
{
std::cerr << separator << TREE_STRING_POINTER( TREE_VALUE ( itrArgument ));
separator = ", ";
}
std::cerr << std::endl;
// Just return a null tree now.
return( NULL_TREE );
}
static struct attribute_spec g_GeneralizedAttribute1 =
{
"generalized_attribute_1", 0, -1, false, true, false, HandleAttribute, false
};
static struct attribute_spec g_GeneralizedAttribute2 =
{
"generalized_attribute_2", 0, -1, false, false, false, HandleAttribute, false
};
// The array of attribute specs passed to register_scoped_attributes must be NULL terminated
attribute_spec demoScopedAttributes[] = { g_GeneralizedAttribute1, g_GeneralizedAttribute2, NULL };
static void RegisterAttributes( void* eventData,
void* userData )
{
register_scoped_attributes( demoScopedAttributes, "demo" );
}
static void GateCallback( void* eventData, void* userData )
{
// If there has been an error, fall through and let the compiler handle it
if( errorcount || sorrycount )
{
return;
}
std::cerr << "IPA Passes Starting for File: " << main_input_filename << std::endl;
}
int plugin_init( plugin_name_args* info,
plugin_gcc_version* ver )
{
std::cerr << "Starting Plugin: "<< info->base_name << std::endl;
register_callback( info->base_name, PLUGIN_ATTRIBUTES, &RegisterAttributes, NULL );
register_callback( info->base_name, PLUGIN_ALL_IPA_PASSES_START, &GateCallback, NULL );
std::cerr << "Plugin Initialized, attribute registered" << std::endl;
return( 0 );
}
[/sourcecode]
The set of includes are pretty much the bare minimum needed for a plugin. The ‘config.h’ file is the compiler configuration which is generated during the build process and can be found with the compiler includes. Aside from the inclusion of ‘<iostream>’ to provide output to the console, the remaining includes are for plugin and attribute support. Since GCC 4.8.0 is compiled using the g++ compiler, it is no longer necessary to wrap the plugin includes with ‘extern C{}’ to denote the difference in name mangling. Also of note is the global symbol ‘plugin_is_GPL_compatible’ which the compiler checks for in the plugin library when it loads the plugin. If the compiler does not find this global symbol, it will not finish loading the plugin.
The ‘HandleAttribute()’ function is a callback that is invoked by the compiler when it encounters a custom attribute registered by the plugin. A separate function pointer to a callback is associated with each attribute registered, so it would be completely reasonable to have a separate callback for each custom attribute. Within the handler, all we do is print out the attribute name and the attribute arguments. The arguments are a GCC tree list of constant values – more on how to interpret GCC trees will appear in followup posts.
Next are static specifications of the two custom attributes. This structure is defined in ‘tree.h’ which also contains good descriptions of the meanings of the fields. I will not re-iterate that documentation here, but be sure to read through the definition to insure you are passing the right values. The ‘RegisterAttributes()’ callback function appears next. The namespace for scoped attributes appears as the second argument to the ‘register_scoped_attributes()’ – for this case the namespace is ‘demo’.
The ‘GateCallback()’ function is invoked by the plugin framework in response to registrations for notification when specific passes have been completed by the compiler.
Finally, the ‘plugin_init()’ function is the entry point for the plugin. After the compiler loads the plugin shared object then it will call this function. There is an argument block and a version information block passed to the function, neither of those arguments are used in this simple example. This function registers two callbacks: the first to register the custom attributes and the second to register a gate callback on the PLUGIN_ALL_IPA_PASSES_START event. Once again, for further detail on the parameters for the ‘plugin_init()’ function, the best bet is to refer to the inline documentation in the GCC source code.
Step 5: Source Code for the Test Project
The source code for a test project with a pair of classes with attributes appears below. This file is just the auto-generated ‘HelloWorld’ project source code with the two demo classes added. Note the C++ 11 syntax for the attributes with the ‘demo’ namespace.
[sourcecode language=”cpp” wraplines=”false” collapse=”false”]
/============================================================================
// Name : TestProject.cpp
// Author :
// Version :
// Copyright : Your copyright notice
// Description : Hello World in C++, Ansi-style
//============================================================================
#include <iostream>
using namespace std;
class [[demo::generalized_attribute_1( "arg1", "arg2" )]] ClassWithAttribute1
{
};
class [[demo::generalized_attribute_2( "arg3" )]] ClassWithAttribute2
{
};
int main() {
cout << "!!!Hello World!!!" << endl; // prints !!!Hello World!!!
return 0;
}
[/sourcecode]
Step 6: Create the .gdbinit file
The ‘.gdbinit’ file contains configuration information for the GDB debugger when it is invoked by the Eclipse IDE. For debugging a GCC plugin, the file should have at least the following contents:
[sourcecode language=”text”]
set schedule-multiple
dir ~/gcc_build/4.8.0/build/gcc
dir ~/gcc_build/4.8.0/gcc
dir ~/gcc_build/4.8.0/gcc/cp
dir ~/gcc_build/4.8.0/gcc/lto
source ~/gcc_build/4.8.0/build/gcc/gdbinit.in
[/sourcecode]
The ‘.gdbinit’ file may be placed in the root directory of the plugin project.
Step 7: Create a Debugger Profile for the Plugin Project
To debug the plugin inside of Eclipse, the approach I use is to adjust the debugging launch profile for the plugin project so that it launches GCC and loads the plugin to compile the source code in the ‘Test Project’. The first step is to set the ‘C/C++ Application’ to the compiler itself in the ‘Main’ dialog of the Debug Launch Configuration Properties, as shown in Figure 7.

Figure 7: Debug Profile Main Dialog
The next step is to tell the compiler to load the plugin, specify C++ 11 semantics and point the compiler at the source code file in ‘TestProject’, as shown in Figure 8.
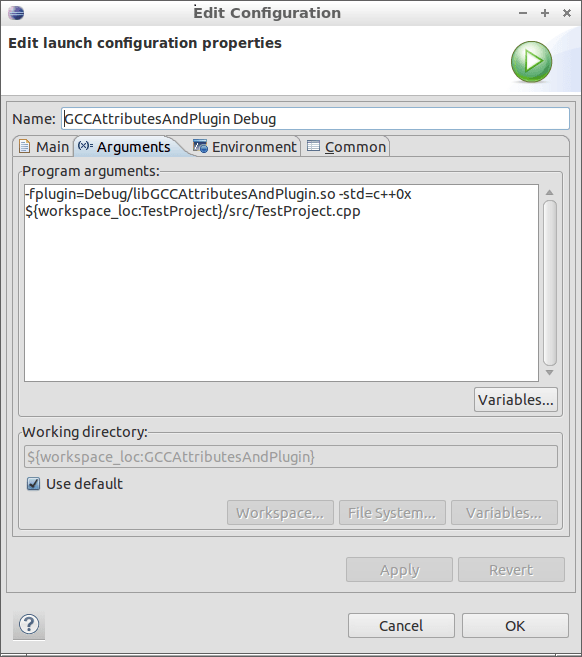
Figure 8: Arguments Tab for the Debug Launch Profile
Next, the LD_LIBRARY_PATH and the PATH environment variables need to be enriched to add the paths to the GCC 4.8.0 compiler executables and libraries. This is done on the ‘Environment’ tab as shown in Figure 9. Additional detail is shown in Figures 10 and 11.
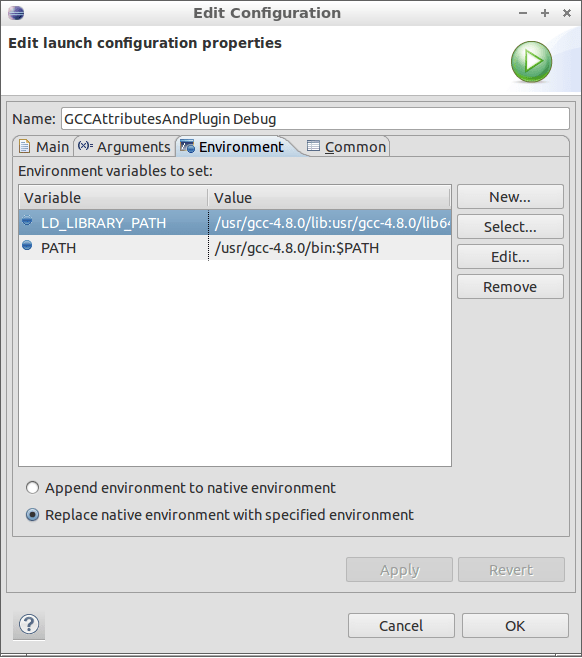
Figure 9: Debug Profile Environment Tab
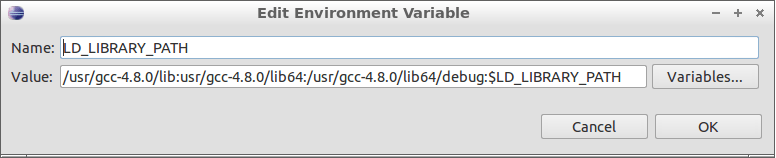
Figure 10: LD_LIBRARY_PATH setting
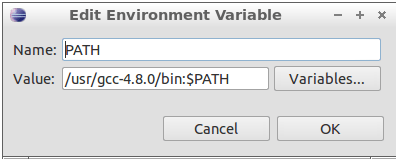
Figure 11: PATH environment variable setting
Finally, on the ‘Debugger’ tab, insure that the ‘GDB Command Line’ points to your ‘.gdbinit’ file created above and check the ‘Automatically debug forked process’ box. GCC forks the g++ compiler from a main controller process, so if this checkbox is blank, then GDB will not debug the forked g++ process where the plugin actually gets loaded.
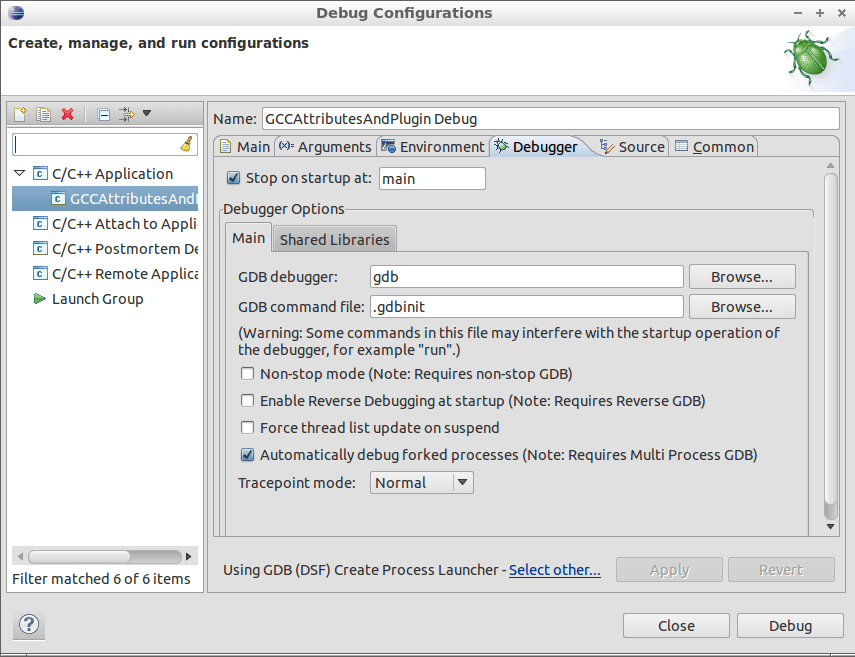
Figure 12: Debug Profile Debugger Tab
Step 8: Pass arguments to the plugin
The command line syntax to pass one or more arguments to a plugin is a little tricky. Given that a multiplicity of plugins may be simultaneously loaded into GCC, the disambiguation of which arguments are associated with which plugin are embedded in the command line. The syntax to pass an argument to a plugin is:
[sourcecode language=”c” wraplines=”false”]
-fplugin-arg-‘plugin name’-‘argument name’=’argument value’
[/sourcecode]
For this example, the program arguments tab would contain the following:
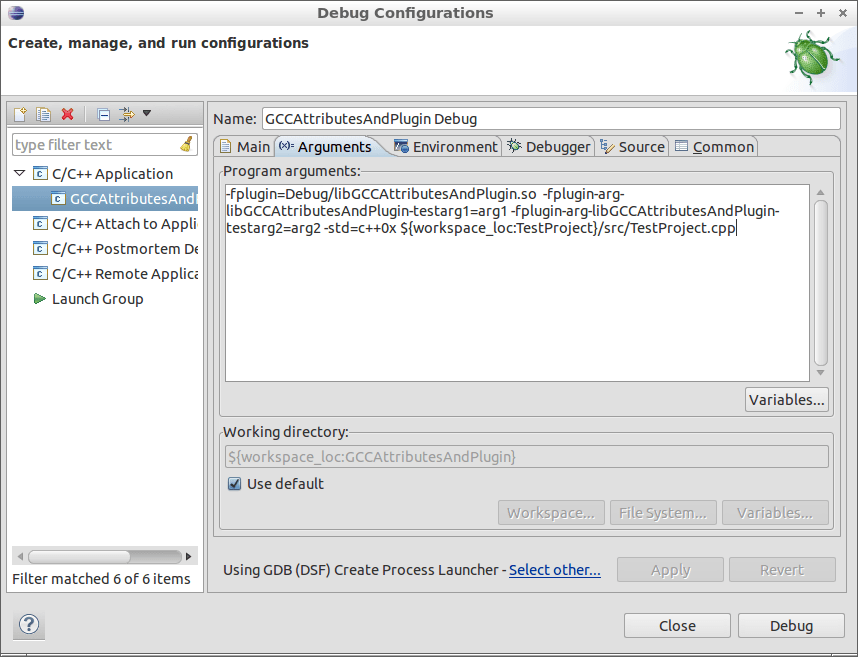
Figure 13: Debug Arguments Tab with Plugin Arguments
Upon entering plugin_init(), the info->argc argument will contain the count of plugin arguments and the info->argv->key and info->argv->value arrays will contain the key value pairs passed on the command line.
Not that the attached example code does not include plugin arguments.
Step 9: Run the code
If you run the debug profile just created for the plugin project you should see output like this in the console:

Figure 14: Debug Console Output
That should do it, you have a basic GCC plugin and attribute framework in place.
Prepackaged Projects
If you have a development environment build as described in my prior posts, then you should be able to take the contents of the attached zip file and simply extract them into your workspace to get the two projects. Also in the zip file is the debug profile which is in the ‘.launches’ directory. This directory needs to be placed under the ‘.metadata/.plugins/org.eclipse.debug.core’ directory for Eclipse to recognize the profile. If you drop in the directory while Eclipse is running, then you will need to re-start Eclipse.