Category Archives: Software Development

Basics of GCC Linker Scripts

Even if you have been using the GCC suite of compilers heavily for years, it is unlikely you have had to create a Linker Script. Linker Scripts are needed when fine-grained control over the memory layout of an executable is required. Most C/C++ code is compiled to an application or service for a specific OS platform, so memory layout is both pre-defined and generally pretty relaxed.

This is not the case for Bare Metal code. When developing for bare metal, the location of the entry point for the code and the locations of global statics, the stack and possibly the heap must be specified. There is no OS or OS Memory Model to be used. The Linker Script defines the foundation of a bare metal code memory model to be used in the output image.

What the Linker Does

The role of the Linker in creating an executable image is to take a collection of input files that contain ‘segments’ and ‘symbols’ and combine those ‘input segments’ into ‘output sections’ of the final image – while also determining the correct value for various unresolved symbols in the ‘input segments’. Additionally, symbols can be defined in a Linker Script and those symbols will be available to source code. Examples of that kind of symbol resolution appear in the example script.

‘Input segments’ are generated by the compilers or assemblers generating the object files linked together to form the output image. As you progress below, ‘segments’ are in object files and ‘sections’ are generated by the linker. Since the code for my bare metal Aarch64 OS is C/C++ (with a little assembly) the C/C++ Memory Model must be used.

Example Linker Script

Linker scripts use the LD Command Language. It is *mostly* specification, there are not if/then style conditionals, though it is possible to test if a symbol is defined. The only required element of a linker script is at least one SECTION. Sections describe the memory layout of the output binary. LD documentation may be found here.

Below is a linker script from a bare metal OS I have been tinkering with for the Aarch64 on the Raspberry Pi. It has a bit of complexity but is still simple enough to understand and either edit or extend for your needs.

As explained at the very top of the script, this is actually a template which is run through the C Preprocessor which then expands the preprocessor directives and generates the final script. The ‘os_memory_config.h‘ file contains the following:

#pragma once

#define STATIC_HEAP_SIZE_IN_BYTES 65536
#define DYNAMIC_HEAP_SIZE_IN_BYTES 65536

The advantage of running this template through the preprocessor is that the symbols STATIC_HEAP_SIZE_IN_BYTES and DYNAMIC_HEAP_SIZE_IN_BYTES are now shared in both the linker script and the C/C++ code base – at C/C++ compile time. It is possible to adjust the size of the heaps from a single file, instead of having to remember that there are two places that must be changed.

Inside the Linker Script

Basic LD Command Syntax

Numeric values in a linker script are all integers and C integer operations are permitted. Symbols may be defined in a linker script. Unquoted symbols follow the same rules as C symbols, but symbols may also be quoted – which permits the inclusion of spaces or perhaps reserved words in the symbol.

Probably the most important symbol is the dot ‘.‘ global symbol. The dot symbol represents the current memory location counter maintained by the linker as it is assembling the output image. It may be both read and set.

Semicolons are required after assignment statements and are permitted in other locations but are not required. If you deep dive and end up using ELF Program Headers, semicolons are required there as well.

Standard C block comments are permitted with /* */ delimiters.

Defining a Memory Block

The snippet above defines a memory block named OS_RAM of 32 megabytes in length, starting at the physical location 0x00080000 which may be read, written to an executed. This location is not an accident – it is the place where the RaspberryPi boot loader loads the OS image. There are additional attributes that can be specified for a memory block and are described in the GCC LD documentation for Memory Layout.

LD permits only a single MEMORY declaration but multiple blocks may be defined in the declaration. It is an optional declaration, if it does not exist, the linker assumes there is sufficient memory for the image.

Defining a Simple Memory Section

Above is the start of the script section specifications and a simple memory section called ‘start’ which is required to start on a 4 byte aligned memory address. The ‘.’ location counter is set to the next four byte aligned location with . = ALIGN(4) and is then read and assigned to the global variable __start with the __start = . statement.

At the end of the section specification, the > OS_RAM directive tells the linker to assign this section to the OS_RAM memory block defined previously in the script. As successive sections are assigned to this block, it will fill. If the size of the sections assigned to the block exceed the 32M size of the block, the linker will exit with an error.

Defining a Section as a Group of Compiler Defined Segments

The C and C++ compilers define code and/or data segments. A section in a linker script usually defines a collection of input segments that are to be grouped into a single section of memory in the output image. An example follows:

The .text section specification contains the KEEP statement in addition to a regular segment inclusion specification. KEEP is not documented in the GCC LD man pages (I have no idea why) but what it does is includes those segments into the linker section and marks them as ‘used’ even if they are not referenced anywhere else in the input object files. Unreferenced input segments will be eliminated as dead code by the linker, unless those segments as identified to be kept. In this case, we need to be sure the .text.boot segment is retained.

The .rodata section includes read only segments defined in the input object files.

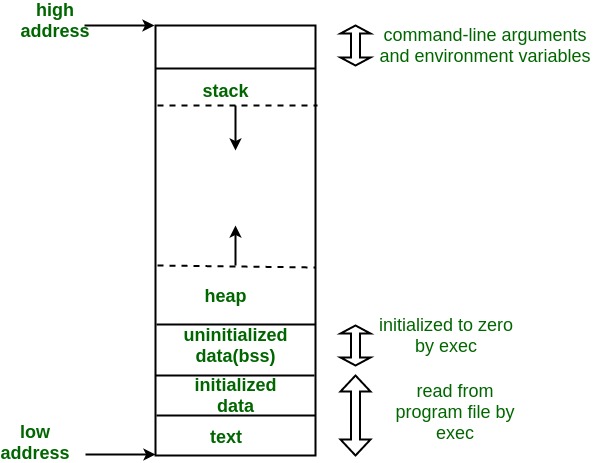
The text segment of a C or C++ program is typically the object code to be executed. The C memory model is illustrated below and the different segments can be found in section declaration statements in the Linker Script.

Borrowed from Geeks4Geeks – https://media.geeksforgeeks.org/wp-content/uploads/memoryLayoutC.jpg

The .rodata and .data linker sections are generally the ‘initialized data’ segment of the map.

Wildcards in Section Specifications

The example above contains a couple different uses of the ‘*’ asterisk as a wildcard. When specifying a segment from an input file be assigned to a segment, the actual syntax is ‘foo.o (.input1)‘ where ‘foo.o‘ is the name of an input object file and .input1 is a segment in ‘foo.o‘. If you know that you will have multiple input files with a .input1 segment, then the file specification can be replaced with a wildcard: ‘*(.input1)‘ – which specifies that any .input1 segment in any input file should be included in the output image.

Segment names may also be wildcarded. For example: ‘*(.input*)‘ specifies that any segment that starts with ‘.input‘ in any input file should be included in the output. In this case, segments .input1, .input2, .input345 will be assigned to the linker section. The linker handles wildcards much like the Unix shell with ‘?’ for single characters, ‘[chars]’ for membership and ‘-‘ for range (i.e. ‘[a-z]’).

C++ Static Variable Initialization

Given the object oriented nature of the C++, there needs to be a mechanism to initialize global class instances *before* program execution. In the Linker Script we see this in the .init_array section.

In the snippet above, memory is aligned to a 16 byte boundary before the .init_array section is declared. Then we insure we have 4 byte alignment (should be the case after the prior alignment anyway) and define the __init_array_start symbol as the current memory location. The .init_array segments from the input object code are then assigned to the segment and then a second symbol __init_array_end is set to the new value of the memory location counter.

The __init_array_start and __init_array_end symbols may be referenced in object code and will be linked into the output image. In the Aarch64 startup code, C++ globals are initialized as the last step before jumping to the start of the ‘kernel main’ function. The init array is just a list of void functions that initialize a global static when called. Therefore, all the assembly language does is starts with __init_array_start , gets a 4 byte address, jumps to it, and then moves to the next sequential address until __init_array_end is reached.

In the C memory map, the C++ intialization array is assigned to the ‘initialized data’ portion of the map.

The BSS Section

In the C memory map there is the ‘uninitialized data segment’ called ‘bss’ which is also referenced in the Linker Script. The bss segment is not initialized as the C++ globals are initialized above but the whole section must be set to zero. The relevant section of the Linker Script is below:

There is a similar pattern here. Align the program counter to a 4 byte boundary, set the __bss_start symbol to the current memory location, keep a couple other sections labelled ‘bss’ in the input files, align the current location counter to an 8 byte boundary so we can set double words in memory to zero and finally create the __bss_end symbol with the 8 byte aligned location. The __bss_size_in_double_words symbol is also computed in the linker script and can be referenced in code (example below).

The section is decorated with NOLOAD, which instructs the linker that there is no code or data to be placed in the output file for this part of the memory map. This makes sense for the .bss section – as it will all be explicitly set to zero in startup code. Another type of section that might be decorated with NOLOAD would be ROM which exists on the HW platform and can be referenced but does not need to be present in the image generated by the linker.

Aarch64 startup assembly language to zero out the .bss section:

Defining an Empty Section

Sometimes it is helpful to define an empty block of memory in the output memory map. The .static_heap section below does just that.

This section is aligned to a 4 byte boundary and then the __static_heap_start symbol is set to the current memory location and then the value of the STATIC_HEAP_SIZE_IN_BYTES symbol included from the .h file is added to the current location. After the location is advanced, the __static_heap_end is set to the current location. No input segments from the input files are assigned to the section and nothing is kept. This is just a chunk of memory. I guess it could be decorated with NOLOAD but since there are no input segments specified – there will be nothing to load anyway. Finally, the symbol __static_heap_size_in_bytes is computed for potential use in the code. Based on the location in the linker script, this heap will appear just after the bss section of the C memory map.

Final Interesting Bits

The Linker Script contains a couple more semi-duplicative sections which carve out memory for heaps and stacks. The need for two different stacks will be discussed in my post on Aarch64 bootstrapping code. The last part of the script that is worth mentioning is the DISCARD section.

The DISCARD section is a ‘reserved’ section which can be assigned input segments from the object code files and which will explicitly remove those segments from the output image. In the example above, anything in any .comment segment will be discarded by the linker and anything in any segment starting with .gnu or .note or .eh_frame will be dropped as well.

Adding the Linker Script to the Link Statement

The code snippet below shows the Makefile specification to process the Linker Script Template with the C Preprocessor, write that file to a new file and then use that new file when linking the output image.

There are a bunch of Makefile symbols above – but the key elements should be apparent.

Where to Find the Code

The Linker Script, Makefiles and source code can be found in my Github repository. I have a prior post on the Makefile design which may also be helpful.

Bare Metal Build System

Normally, I prefer using CMake for C/C++ projects but for bare metal development, there are a number of requirements that are difficult to meet with CMake. Put simply, I could probably find a way to manage a bare metal build with CMake but at present, using good old Make seems preferable. One example of a bare metal challenge for CMake is specifying a Linker Script. There are ways to add a linker script as a dependency using CMake but they are generally pretty cryptic.

This post describes features of the GNU Make tool.

Primary Requirements for Bare Metal Build System

There are a handful of requirements I have for the build system:

  1. DRY – define compile and link settings once in one location
  2. Build subdirectories without a separate makefile in each subdirectory
  3. Support linker scripts naturally
  4. Simple debugging capability

Make is really just the combination of a rule execution engine with a text substitution and expansion engine. This combination is powerful but it is sometimes difficult to wrap one’s head around what is happening when make processes a makefile. In short, when making a build, make starts with the top level goal and then derives all the dependencies required to complete that goal and then satisfies those dependencies. For the case of an executable, the dependencies are compiling the source files and then linking the executable. Along the way, there is the potential for a lot of test expansion to generate the dependency names.

Make ‘include’

To satisfy the DRY (Do not Repeat Yourself) requirement, make has the ability to include other make files using the ‘include’ command. I have extracted the parameters needed across all the different projects in my bare metal system and put them into a ‘makefile.mk‘ file which is included at the top of each project’s makefile. For example, the shared symbols for the AArch64 bare metal cross compilation build appear below:

TOOLS := ${HOME}/dev_tools
GCC_CROSS_DIRECTORY := ${HOME}/dev/gcc-cross

GCC_VERSION := 12.3.1

GCC_CROSS_TOOLS_PATH := $(TOOLS)/arm-gnu-toolchain-12.3.rel1-x86_64-aarch64-none-elf/bin/
GCC_CROSS_INCLUDE := $(GCC_CROSS_DIRECTORY)/aarch64-none-elf

CC := $(GCC_CROSS_TOOLS_PATH)aarch64-none-elf-gcc

LD := $(GCC_CROSS_TOOLS_PATH)aarch64-none-elf-ld

AR := $(GCC_CROSS_TOOLS_PATH)aarch64-none-elf-ar

OBJCOPY := $(GCC_CROSS_TOOLS_PATH)aarch64-none-elf-objcopy

CPREPROCESSOR := $(GCC_CROSS_TOOLS_PATH)aarch64-none-elf-cpp

ASM_FLAGS := -Wall -O2 -ffreestanding -mcpu=cortex-a53 -mstrict-align

C_FLAGS := -Wall -O2 -ffreestanding -fno-stack-protector -nostdinc -nostdlib -nostartfiles -fno-exceptions -fno-unwind-tables -mcpu=cortex-a53 -mstrict-align

CPP_FLAGS := $(C_FLAGS) -std=c++20 -fno-rtti

LD_FLAGS := -nostartfiles -nodefaultlibs -nostdlib -static

INCLUDE_DIRS := -I$(GCC_CROSS_INCLUDE)/lib/gcc/aarch64-none-elf/$(GCC_VERSION)/include -I$(GCC_CROSS_INCLUDE)/lib/gcc/aarch64-none-elf/$(GCC_VERSION)/include-fixed -I$(GCC_CROSS_INCLUDE)/aarch64-none-elf/include

CATCH2_PATH := $(TOOLS)/Catch2

TEST_CC := gcc

TEST_LD := g++

TEST_CFLAGS := -Wall -O2

TEST_CPP_FLAGS := $(TEST_CFLAGS) -std=c++20

COVERAGE_CC := gcc

COVERAGE_LD := g++

COVERAGE_CFLAGS := -Wall -O0 -fprofile-arcs -ftest-coverage

COVERAGE_CPP_FLAGS := $(COVERAGE_CFLAGS) -std=c++20

This file is included in subsequent makefiles with:

include ../Makefile.mk

Build Subdirectories with Make Functions

Make has a powerful set of functions which operate on symbols and lists specified in the makefile. I have used six of these functions to allow my makefile to process subdirectories in a project. The functions and snippets of the GNU Make documentation for each appears below :

Key Functions

  • $(addprefix prefix,names…) – prepends each ‘name‘ with the specified ‘prefix
  • $(patsubst pattern,replacement,text) – Finds whitespace-separated words in ‘text’ that match ‘pattern’ and replaces them with ‘replacement‘. Here ‘pattern’ may contain a ‘%’ which acts as a wildcard, matching any number of any characters within a word. If ‘replacement’ also contains a ‘%’, the ‘%’ is replaced by the text that matched the ‘%’ in ‘pattern‘. Words that do not match the ‘pattern’ are kept without change in the output. Only the first ‘%’ in the ‘pattern’ and ‘replacement’ is treated this way; any subsequent ‘%’ is unchanged.
  • $(wildcard pattern…) – used anywhere in a makefile, is replaced by a space-separated list of names of existing files that match one of the given file name ‘patterns‘. If no existing file name matches a ‘pattern‘, then that ‘pattern’ is omitted from the output of the wildcard function. Note that this is different from how unmatched wildcards behave in rules, where they are used verbatim rather than ignored (see Pitfalls of Using Wildcards).
  • $(foreach var,list,text) – The first two arguments, ‘var’ and ‘list‘, are expanded before anything else is done; note that the last argument, ‘text‘, is not expanded at the same time. Then for each word of the expanded value of ‘list‘, the variable named by the expanded value of ‘var’ is set to that word, and ‘text’ is expanded. Presumably ‘text’ contains references to that variable, so its expansion will be different each time. The result is that ‘text’ is expanded as many times as there are whitespace-separated words in ‘list‘. The multiple expansions of ‘text’ are concatenated, with spaces between them, to make the result of ‘foreach‘.
  • $(call variable,param,param,…) – The ‘call’ function is unique in that it can be used to create new parameterized functions. You can write a complex expression as the value of a ‘variable‘, then use call to expand it with different values. When make expands this function, it assigns each ‘param’ to temporary variables $(1), $(2), etc. The variable $(0) will contain ‘variable‘. There is no maximum number of parameter arguments. There is no minimum, either, but it doesn’t make sense to use ‘call’ with no parameters.
  • $(eval param) – The ‘eval’ function is very special: it allows you to define new makefile constructs that are not constant; which are the result of evaluating other variables and functions. The argument to the ‘eval’ function is expanded, then the results of that expansion are parsed as makefile syntax. The expanded results can define new make variables, targets, implicit or explicit rules, etc. The result of the ‘eval’ function is always the empty string; thus, it can be placed virtually anywhere in a makefile without causing syntax errors. It’s important to realize that the ‘eval’ argument is expanded twice; first by the ‘eval’ function, then the results of that expansion are expanded again when they are parsed as makefile syntax. This means you may need to provide extra levels of escaping for “$” characters when using ‘eval’. The ‘value’ function (see The value Function) can sometimes be useful in these situations, to circumvent unwanted expansions.

With the exception of ‘addprefix‘ the other functions can be a bit complex. GNU Make documentation has more descriptive detail and examples. The key to the makefile operation is the use of these functions together with the text expansion engine to automatically generate dependencies from subdirectories.

Example Makefile

include ../Makefile.mk

SRC_ROOT := src
BUILD_ROOT := build
IMAGE_DIR := image

BUILD_DIRS := $(IMAGE_DIR) $(BUILD_ROOT) $(BUILD_ROOT)/asm $(BUILD_ROOT)/c $(BUILD_ROOT)/c/utility $(BUILD_ROOT)/c/platform $(BUILD_ROOT)/c/platform/rpi3 $(BUILD_ROOT)/c/platform/rpi4 $(BUILD_ROOT)/c/devices $(BUILD_ROOT)/c/devices/rpi3 $(BUILD_ROOT)/c/devices/rpi4 $(BUILD_ROOT)/c/isr $(BUILD_ROOT)/c/filesystem $(BUILD_ROOT)/c/services

ASM_DIRS := asm
C_DIRS := c c/utility c/platform c/platform/rpi3 c/platform/rpi4 c/devices c/devices/rpi3 c/devices/rpi4 c/isr c/filesystem c/services
CPP_DIRS := c c/utility c/platform c/platform/rpi3 c/platform/rpi4 c/devices c/devices/rpi3 c/devices/rpi4 c/isr c/filesystem c/services

ASM_SRC_DIRS := $(addprefix $(SRC_ROOT)/,$(ASM_DIRS))
C_SRC_DIRS := $(addprefix $(SRC_ROOT)/,$(C_DIRS))
CPP_SRC_DIRS := $(addprefix $(SRC_ROOT)/,$(CPP_DIRS))

ELF := $(BUILD_ROOT)/kernel8.elf
IMG := $(IMAGE_DIR)/kernel8.img

ASM_SRC := $(foreach sdir,$(ASM_SRC_DIRS),$(wildcard $(sdir)/*.S))
C_SRC := $(foreach sdir,$(C_SRC_DIRS),$(wildcard $(sdir)/*.c))
CPP_SRC := $(foreach sdir,$(CPP_SRC_DIRS),$(wildcard $(sdir)/*.cpp))

OBJ := $(patsubst src/asm/%.S,build/asm/%.o,$(ASM_SRC)) $(patsubst src/c/%.c,build/c/%.o,$(C_SRC)) $(patsubst src/c/%.cpp,build/c/%.o,$(CPP_SRC))

INCLUDE_DIRS += -Iinclude -I../minimalstdio/include -I../minimalclib/include -I../minimalstdlib/include
LDFLAGS += -L../minimalstdio/lib -L../minimalclib/lib
LDLIBS = -lminimalstdio -lminimalclib

LINKER_SCRIPT_TEMPLATE=link.template.ld
LINKER_SCRIPT=$(BUILD_ROOT)/link.ld


all: clean checkdirs $(IMG)


$(IMG): $(ELF)
$(OBJCOPY) -O binary $(ELF) $(IMG)
/bin/cp redistrib/*.* image/.
/bin/cp armstub/image/armstub_minimal.bin image/.
/bin/cp resources/*.txt image/.
/bin/cp resources/sd.img image/.

$(ELF): $(OBJ) $(LINKER_SCRIPT)
$(LD) $(LDFLAGS) $(OBJ) $(LDLIBS) -T $(LINKER_SCRIPT) -o $(ELF)


$(LINKER_SCRIPT):
$(CPREPROCESSOR) -Iinclude $(LINKER_SCRIPT_TEMPLATE) -o $(LINKER_SCRIPT)

define make-asm-goal
$(BUILD_ROOT)/$1/%.o: $(SRC_ROOT)/$1/%.S
$(CC) $(INCLUDE_DIRS) $(ASM_FLAGS) -c $$< -o $$@
endef

define make-c-goal
$(BUILD_ROOT)/$1/%.o: $(SRC_ROOT)/$1/%.c
$(CC) $(INCLUDE_DIRS) $(C_FLAGS) -c $$< -o $$@
endef

define make-cpp-goal
$(BUILD_ROOT)/$1/%.o: $(SRC_ROOT)/$1/%.cpp
$(CC) $(INCLUDE_DIRS) $(CPP_FLAGS) -c $$< -o $$@
endef


$(foreach bdir,$(ASM_DIRS), $(eval $(call make-asm-goal,$(bdir))))
$(foreach bdir,$(C_DIRS), $(eval $(call make-c-goal,$(bdir))))
$(foreach bdir,$(CPP_DIRS), $(eval $(call make-cpp-goal,$(bdir))))

The BUILD_DIRS symbol contains the list of all the directories into which source code will be compiled. It is critical (though unsurprising) that the subdirectory structure of the build directory match the subdirectory structure of the source code.

ASM_DIRS, C_DIRS and CPP_DIRS specifies the list of directories with assembly, C and C++ source code. There must be agreement between these directories and those listed in BUILD_DIRS.

In the first bit of Make function magic, the ASM_SRC_DIRS, C_SRC_DIRS and CPP_SRC_DIRS are generated by adding the SRC_ROOT prefix to ASM_DIRS, C_DIRS and CPP_DIRS respectively.

ASM_SRC, C_SRC and CPP_SRC are then generated by looping over each entry in ASM_SRC_DIRS, C_SRC_DIRS and CPP_SRC_DIRS with ‘foreach‘ and then using the ‘wildcard‘ function to find all assembly, C and C++ source code in each of the directories in each of the source directories list respectively.

After all the source files are assembled above, all of the object files are generated in the OBJ list by using the ‘patsubst‘ function on each of the three source lists to replace the source code extensions ‘.S’, ‘.c’ and ‘.cpp’ with ‘.o’.

In the top section of the makefile, we have used a set of Make functions to transform a list of directories into a fully enumerated list of source files and object files. If a new subdirectory is added to the project, it simply needs to be added to the list of directories in the BUILD_DIRS list and the correct ASM_DIRS, C_DIRS and/or CPP_DIRS list depending on the compilation requirements.

Skipping ahead a bit, the variables make-asm-goal, make-c-goal and make-cpp-goal are defined using the ‘define‘ syntax which permits the variable to contain newlines. This is helpful for makefile snippets which will be passed to ‘eval‘.

Below those definitions, the is another set of ‘foreach‘ functions which then use ‘eval‘ and ‘call‘ to take the goals just defined and generate a fully enumerated set of goals for the ASM_DIRS, C_DIRS and CPP_DIRS directory lists.

What finally ties everything together is the $(ELF) target which has a dependency on all of the object files in the $(OBJ) list. This also pulls in the linker script as a separate target which has been fed to the C preprocessor. I had a handful of symbols that needed to be shared across the C/C++ source code and the linker script, so I chose to use the C preprocessor to include those symbols and expand them in the linker script. This is a pretty clean, elegant way to insure the symbols can be defined outside of the linker script and shared with other source code.

Double-Checking the Build

The echo target lists all of the directories, source files an object files to be built and demonstrates the expansion engine in action with the operation of the different functions:

$ make echo

Build Directories: image build build/asm build/c build/c/utility build/c/platform build/c/platform/rpi3 build/c/platform/rpi4 build/c/devices build/c/devices/rpi3 build/c/devices/rpi4 build/c/isr build/c/filesystem build/c/services

ASM Source Directories: src/asm

C Source Directories: src/c src/c/utility src/c/platform src/c/platform/rpi3 src/c/platform/rpi4 src/c/devices src/c/devices/rpi3 src/c/devices/rpi4 src/c/isr src/c/filesystem src/c/services

CPP Source Directories: src/c src/c/utility src/c/platform src/c/platform/rpi3 src/c/platform/rpi4 src/c/devices src/c/devices/rpi3 src/c/devices/rpi4 src/c/isr src/c/filesystem src/c/services

ASM Files: src/asm/configure_gic.S src/asm/get_exception_level.S src/asm/global_variables.S src/asm/identify_board_type.S src/asm/isr_kernel_entry.S src/asm/park_core.S src/asm/setup_physical_timer.S src/asm/start.S src/asm/utility.S

C Files:

CPP Files: src/c/main.cpp src/c/utility/cppsupport.cpp src/c/utility/dump_diagnostics.cpp src/c/utility/memory.cpp src/c/utility/regex.cpp src/c/platform/exception_manager.cpp src/c/platform/kernel_command_line.cpp src/c/platform/platform.cpp src/c/platform/platform_info.cpp src/c/platform/rpi3/rpi3_platform_info.cpp src/c/platform/rpi4/rpi4_platform_info.cpp src/c/devices/block_io.cpp src/c/devices/emmc.cpp src/c/devices/log.cpp src/c/devices/mailbox.cpp src/c/devices/physical_timer.cpp src/c/devices/power_manager.cpp src/c/devices/sd_card.cpp src/c/devices/std_streams.cpp src/c/devices/system_timer.cpp src/c/devices/uart0.cpp src/c/devices/uart1.cpp src/c/devices/rpi3/rpi3_hw_rng.cpp src/c/devices/rpi4/rpi4_hw_rng.cpp src/c/isr/system_timer_reschedule_isr.cpp src/c/isr/task_switch_isr.cpp src/c/filesystem/fat32_blockio_adapter.cpp src/c/filesystem/fat32_directory_cluster.cpp src/c/filesystem/fat32_filesystem.cpp src/c/filesystem/filesystem_errors.cpp src/c/filesystem/filesystems.cpp src/c/filesystem/master_boot_record.cpp src/c/services/murmur_hash.cpp src/c/services/os_entity_registry.cpp src/c/services/random_number_generator.cpp src/c/services/uuid.cpp src/c/services/xoroshiro128plusplus.cpp

Object Files: build/asm/configure_gic.o build/asm/get_exception_level.o build/asm/global_variables.o build/asm/identify_board_type.o build/asm/isr_kernel_entry.o build/asm/park_core.o build/asm/setup_physical_timer.o build/asm/start.o build/asm/utility.o build/c/main.o build/c/utility/cppsupport.o build/c/utility/dump_diagnostics.o build/c/utility/memory.o build/c/utility/regex.o build/c/platform/exception_manager.o build/c/platform/kernel_command_line.o build/c/platform/platform.o build/c/platform/platform_info.o build/c/platform/rpi3/rpi3_platform_info.o build/c/platform/rpi4/rpi4_platform_info.o build/c/devices/block_io.o build/c/devices/emmc.o build/c/devices/log.o build/c/devices/mailbox.o build/c/devices/physical_timer.o build/c/devices/power_manager.o build/c/devices/sd_card.o build/c/devices/std_streams.o build/c/devices/system_timer.o build/c/devices/uart0.o build/c/devices/uart1.o build/c/devices/rpi3/rpi3_hw_rng.o build/c/devices/rpi4/rpi4_hw_rng.o build/c/isr/system_timer_reschedule_isr.o build/c/isr/task_switch_isr.o build/c/filesystem/fat32_blockio_adapter.o build/c/filesystem/fat32_directory_cluster.o build/c/filesystem/fat32_filesystem.o build/c/filesystem/filesystem_errors.o build/c/filesystem/filesystems.o build/c/filesystem/master_boot_record.o build/c/services/murmur_hash.o build/c/services/os_entity_registry.o build/c/services/random_number_generator.o build/c/services/uuid.o build/c/services/xoroshiro128plusplus.o

This is where one can see all of the pieces of the makefile come together and meets my requirement for a simple debugging capability. 

Extending the build

As mentioned above, adding a new subdirectory is straightforward – all one must do is add the subdirectory to the list of directories in the BUILD_DIRS list and the correct ASM_DIRS, C_DIRS and/or CPP_DIRS list depending on the compilation requirements. Yes, it has to be put in two places – but that is because the BUILD_DIRS list specifies where the object file will be written whereas the ASM_DIRS, C_DIRS and CPP_DIRS lists specify which tool is used to assemble or compile the source code.

Beyond that, really you don’t need to understand the mechanics of the makefile. If you have a C++ only project, you can strip out the C and Assembly code processing, though for C++ only, CMake is probably a better choice. If you don’t want to use CMake, then the makefile skeleton above *should* meet just about any need.

RPI Bare Metal Project

The makefile above is part of the Raspberry Pi Bare Metal OS project I have been pursuing. This project can be found in Github at: https://github.com/stephanfr/RPIBareMetalOS.git

Using Packer To Build Development VMs

One fundamental development practice is to have a bullet-proof, repeatable process for building, upgrading and maintaining development environments. My current development practice relies on developing inside a VM using Visual Studio Code’s Remote Development plugin. I treat the development VMs as ‘disposable’, i.e. at any moment in time I ought to be able to commit my work in progress to Github, destroy the VM, build a new one and pick up right where I left off. I should also be able to move seamlessly from one virtualized environment to another – for example, I should be able to develop in the Proxmox VM at home and a VirtualBox VM on my laptop when I travel without any friction between the two.

I use Hashicorp’s Packer tool to automate the VM build and configuration process. I usually maintain two target platforms: 1) a Proxmox server with an NFS backend I maintain at home and 2) VirtualBox which is installed on my laptops. Packer is declarative and supports multiple ‘builders’ for different backends. Both Proxmox and VirtualBox are supported and there is minimal difference in the builder specifications between the two.

Practical Packer

Packer and its builders and provisioners do most of the heavy lifting for you in terms of getting a ‘vanilla’ VM built. Perhaps the most complicated bit is figuring out the correct ‘boot command prefix’ to get past the bootloader. Honestly, getting a prefix that works involves a bit of trial and error and is somewhat cryptic. For the projects I have in Github, the prefix ‘works for me’ but if you are running on either a very fast or very slow machine, then your mileage may vary.

With a ‘vanilla’ VM in hand, the next step is to tailor it to your development needs. Packer is not inherently modular but I have managed to introduce some modularity by providing a collection of scripts that will be run inside the VM after it boots to customize the environment. The Packer specification will invoke these scripts which will either execute or return immediately based on environment variables set from Packer variables which can be set in a HCL file or set on the Packer command line.

The main challenge when executing the scripts is determining if you want the scripted commands to run as root, which is how the provisioner executes shell scripts, or as the ‘development user’ created early in the provisioning process. Essentially, the ‘development user’ is the username you will want to use when logging into the VM for development. The scripts will automatically create this user and assign a single-use password that will have to be changed on first login. The ‘change on login’ feature was not straightforward – so if you want a similar capability, just lift it from my code.

Github Projects

In the https://github.com/stephanfr/Packer repository you will find the Packer specifications for building Ubuntu development VMs in either a Proxmox or VirtualBox environment as well as a project which will allow you to build a VM which can then be used to build bootable, customized RPi images in QEMU. This is a very nice capability and is all due to the work of Mateusz Kaczanowski’s in his PackerBuilderArm Project.

One VM build option sets up an AArch64 bare-metal build environment inside the VM with a directory structure for my RPi Bare Metal OS project. In general though, if you are looking for an easy ARM toolchain setup – you can lift that code as well and modify it for your purposes.

Maintenance

Since I use these specs myself, I will track Ubuntu releases and tooling updates – but the timing is likely to be a bit erratic. I do not generally update tools immediately, I tend to value a stable environment over ‘latest and greatest’ but once a year or so I will update. Mostly updates *should* be limited to tweaking config values but sometimes, stuff just breaks. For example, I have not had success automating deployment of the very most recent Ubuntu VMs.

Serial and SIMD implementation of the Xoshiro256+ random number generator – Part 1 Implementation and Usage

The Xoshiro256PlusSIMD project provides a C++ implementation of Xoshiro256+ random number generator that matches the performance of the reference C implementation of David Blackman and Sebastiano Vigna (https://prng.di.unimi.it/). Xoshiro256+ combines high speed, small memory space requirements for stored state and excellent statistical quality. For cryptographic use cases or use cases where absolutely the best statistical quality is required – maybe consider a different RNG like the Mersenne Twist. For any any other conventional simulation or testing use case, Xoshiro256+ should be perfectly fine statistically and better than a whole lot of other slower alternatives.

This implementation is a header-only library and provides the following capabilities:

  • Single 64 bit unsigned random value
  • Single 64 bit unsigned random value reduced to a [lower, upper) range
  • Four 64 bit unsigned random values
  • Four 64 bit unsigned random values reduced to a [lower, upper) range
  • Single double length real random value in a range of (0,1)
  • Single double length real random value in a (lower, upper) range
  • Four double length real random values in a range of (0,1)
  • Four double length real random values in a (lower, upper) range

Implementation Details

For platforms supporting the AVX2 instruction set, the RNG can be configured to use AVX2 instructions or not on an instance by instance basis. AVX2 instructions are only used for the four-wide operations, there is no advantage using them for single value generation.

The four-wide operations use a different random seed per value and the the seed for single value generation is distinct as well. The same stream of values will be returned by the serial and AVX2 implementations. It might be faster for the serial implementation to use only a single seed across all the four values – each increasing index being the next value in a single series, instead of each of the four values having its unique series. The downside of that approach is that the serial implementation would return different four wide values than the AVX2 implementation. The AVX2 implementation must use distinct seeds for each of the four values.

The random series for each of the four-wide values are separated by 2^192 values – i.e. a Xoshiro256+ ‘long jump’ separates the seed for each of the four values. For clarity, the Xoshiro256+ has a state space of 2^256.

The reduction of the uint64s to an integer range takes uint32 bounds. This is a significant reduction in the size of the random values but permits reduction while avoiding taking a modulus. If you have a need for random integer values beyond uint32 sizes, I’d suggest taking the full 64 bit values and applying your own reduction algorithm. The modulus approach to reduction is slower than the approach in the code which uses shifts and a multiply.

Finally, the AVX versions are coded explicitly with AVX intrinsics, there is no reliance on the vageries of compiler vectorization. The SIMD version could be written such that gcc should unroll loops and vectorize but others have reported that it is necessary to tweak optimization flags to get the unrolling to work. For these implementations, all that is needed is to have the -mavx2 compiler option and the AVX2_AVAILABLE symbol defined.

Usage

The class Xoshiro256Plus is a template class and takes an SIMDInstructionSet enumerated value as its only template parameter. SIMDInstructionSet may be ‘NONE’, ‘AVX’ or ‘AVX2’. The SIMD acceleration requires the AVX2 instruction set and uses ‘if contexpr’ to control code generation at compile time. There is also a preprocessor symbol AVX2_AVAILABLE which must be defined to permit AVX2 instances of the RNG to be created. It it completely reasonable to have the AVX2 instruction set available but still use an RNG instance with no SIMD acceleration.

#define __AVX2_AVAILABLE__

#include "Xoshiro256Plus.h"

constexpr size_t NUM_SAMPLES = 1000;
constexpr uint64_t SEED = 1;

typedef SEFUtility::RNG::Xoshiro256Plus Xoshiro256PlusSerial;
typedef SEFUtility::RNG::Xoshiro256Plus Xoshiro256PlusAVX2;

bool InsureFourWideRandomStreamsMatch()
{
    Xoshiro256PlusSerial serial_rng(SEED);
    Xoshiro256PlusAVX2 avx_rng(SEED);

    for (auto i = 0; i < NUM_SAMPLES; i++)
    {
        auto next_four_serial = serial_rng.next4( 200, 300 );
        auto next_four_avx = avx_rng.next4( 200, 300 );

        if(( next_four_serial[0] != next_four_avx[0] ) ||
           ( next_four_serial[1] != next_four_avx[1] ) ||
           ( next_four_serial[2] != next_four_avx[2] ) ||
           ( next_four_serial[3] != next_four_avx[3] ))
        { return false; }
    }

    return true;
}

HeapWatcher : Memory Leak Detector for Automated Testing


This project provides a simple tool for tracking heap allocations between start/finish points in C++ code. It is intended for use in unit test and perhaps some feature tests. It is not a replacement for Valgrind or other memory debugging tools – the primary intent is to provide an easy-to-use tool that can be added to unit tests built with GoogleTest or Catch2 to find leaks and provide partial or full stack dumps of leaked allocations.

The project can be found in github at: https://github.com/stephanfr/HeapWatcher

Design

The C standard library functions of malloc(), calloc(), realloc() and free() are ‘weak symbols‘ in glibc and can be replaced by user-supplied functions with the same signatures supplied in a user static library or shared object. This tool wraps the c standard library calls and then tracks all allocations and frees in a map. The ‘book-keeping’ is performed in a separate thread to (1) limit the need for mutexes or critical sections to protect shared state and (2) limit the run-time performance impact on the code under test. The functions in HeapWatcher are not intrusive in that they simply delegate to the glibc functions and then track allocations in a separate data structure. Allocation tracking can be paused in any thread being tracked and there is a facility to capture stack traces for ‘intentional leaks’ and then ignore those for tracking purposes.

There exists a single global static instance of HeapWatcher which can be accessed with the SEFUtility::HeapWatcher::get_heap_watcher() function.

Additionally, there are a pair of multi-threaded test fixtures provided in the project. One fixture launches workload threads and requires the user to manage the heap watcher. The second test fixture integrates the heap watcher and tracks all allocations made while the instance of the fixture itself is in scope.

For memory intensive applications running on many cores, the single tracker thread may be insufficient. All allocation records go into a queue, will not be lost and will eventually be processed. Potential problems can arise if the application allocates faster than the single thread can keep up and the queue used for passing the records to the tracker thread grows to the point that it exhausts system memory. When the HeapWatcher stops, the memory snapshot it returns is the result of processing all allocation records – so it should be correct.

Including into a Project

Probably the easiest way to use HeapWatcher is to include it through the fetch mechanism provided by CMake:

FetchContent_Declare(
    heapwatcher
    GIT_REPOSITORY "https://github.com/stephanfr/HeapWatcher.git" )

FetchContent_MakeAvailable(heapwatcher)

include_directories(
    ${heapwatcher_SOURCE_DIR}/include
    ${heapwatcher_BIN_DIR}
)

The CMake specification for HeapWatcher will build the library which muct be linked into your peoject. In addition, for the call stack decoding to work properly, the following linker option must be included in your project as well:

SET(CMAKE_EXE_LINKER_FLAGS "${CMAKE_EXE_LINKER_FLAGS} -rdynamic")


HeapWatcher is not a header-only project, the linker must have concrete instances of malloc(), calloc(), realloc() and free() to link to the rest of the code under test. Given the ease of including the library with CMake, this doesn’t present much of a problem overall.

Using HeapWatcher


Only a single header file HeapWatcher.hpp must be included in any file wishing to use the tool. This header contains all the data structures and classes needed to use the tool. The HeapWatcher class itself is fairly simple and the call to retrieve the global instance is trivial :

namespace SEFUtility::HeapWatcher
{
    class HeapWatcher
    {
        public:
            virtual void start_watching() = 0;
            virtual HeapSnapshot stop_watching() = 0;

            [[nodiscard]] virtual PauseThreadWatchGuard pause_watching_this_thread() = 0;
            
            virtual uint64_t capture_known_leak(std::list<std::string>& leaking_symbols, std::function<void()> function_which_leaks) = 0;
            [[nodiscard]] virtual const KnownLeaks known_leaks() const = 0;

            [[nodiscard]] virtual const HeapSnapshot snapshot() = 0;
            [[nodiscard]] virtual const HighLevelStatistics high_level_stats() = 0;
    };

    HeapWatcher& get_heap_watcher();
}


Note the namespace declaration. There are a number of other classes declared in the HeapWatcher.cpp header for the HeapSnapshot and to provide the pause watching capability. A simple example of using HeapWatcher in a Catch2 test appears below:

void OneLeak() { int* new_int = static_cast(malloc(sizeof(int))); }

void OneLeakNested() { OneLeak(); }
   
TEST_CASE("Basic HeapWatcher Tests", "[basic]")
{
    SECTION("One Leak Nested", "[basic]")
    {
        SEFUtility::HeapWatcher::get_heap_watcher().start_watching();

        OneLeakNested();

        auto leaks(SEFUtility::HeapWatcher::get_heap_watcher().stop_watching());

        REQUIRE(leaks.open_allocations().size() == 1);

        REQUIRE_THAT(leaks.open_allocations()[0].stack_trace()[0].function(), Catch::Matchers::Equals("OneLeak()"));
        REQUIRE_THAT(leaks.open_allocations()[0].stack_trace()[1].function(),
                    Catch::Matchers::Equals("OneLeakNested()"));

        REQUIRE(leaks.high_level_statistics().number_of_mallocs() == 1);
        REQUIRE(leaks.high_level_statistics().number_of_frees() == 0);
        REQUIRE(leaks.high_level_statistics().number_of_reallocs() == 0);
        REQUIRE(leaks.high_level_statistics().bytes_allocated() == sizeof(int));
        REQUIRE(leaks.high_level_statistics().bytes_freed() == 0);
    }
}

Capturing Known Leaks

In various third party libraries there exist intentional leaks. A good example is the leak of a pointer for thread local storage for each thread created by the pthread library. There is a leak from the symbol ‘dl_allocate_tls‘ that appears to remain even after std::thread::join() is called. This appears not infrequently in Valgrind reports as well. Given the desire to make this a library for automated testing, there is the capability to capture and then ignore allocations from certain functions or methods. An example appears below:

SECTION("Known Leak", "[basic]")
{
    std::list<std::string> leaking_symbol({"KnownLeak()"});

    REQUIRE( SEFUtility::HeapWatcher::get_heap_watcher().capture_known_leak(leaking_symbol, []() { KnownLeak(); }) == 1 );

    REQUIRE(SEFUtility::HeapWatcher::get_heap_watcher().known_leaks().addresses().size() == 2);
    REQUIRE_THAT(SEFUtility::HeapWatcher::get_heap_watcher().known_leaks().symbols()[0].function(),
                 Catch::Matchers::Equals("_dl_allocate_tls"));
    REQUIRE_THAT(SEFUtility::HeapWatcher::get_heap_watcher().known_leaks().symbols()[1].function(),
                 Catch::Matchers::Equals("KnownLeak()"));

    SEFUtility::HeapWatcher::get_heap_watcher().start_watching();

    OneLeakNested();
    KnownLeak();
    OneLeak();

    auto leaks(SEFUtility::HeapWatcher::get_heap_watcher().stop_watching());

    REQUIRE(leaks.open_allocations().size() == 2);
}

The capture_known_leak() method takes two arguments: 1) a std::list<std::string> containing one or more symbols which if located in a stack trace will cause the allocation associated with the trace to be ignored and 2) a function (or lambda) which will evoke one or more leaks associated with the symbols passed in the first argument. The leaking function need not be just adjacent to the malloc, it may be further up the call stack but the allocation will only be ignored if it appears at the same number of frames above the memory allocation as at the time the leak was captured.

This approach of actively capturing the leak at runtime is effective for dealing with ASLR (Address Space Layout Randomization) and does not require loading of shared libraries or other linking or loading gymnastics.

Pausing Allocation Tracking


The PauseThreadWatchGuard instance returned by a call to HeapWatcher::pause_watching_this_thread() is a scope based mechanism for suspending heap activity tracking in a thread. For example, the above snippet can be modified to not log the leak in OneLeakNested() by obtaining a guard and putting the leaking call into the same scope as the guard:

    SEFUtility::HeapWatcher::get_heap_watcher().start_watching();

    {
      auto pause_watching = SEFUtility::HeapWatcher::get_heap_watcher().pause_watching_this_thread();

      OneLeakNested();
    }

    auto leaks(SEFUtility::HeapWatcher::get_heap_watcher().stop_watching());

    REQUIRE(leaks.open_allocations().size() == 0);

Once the guard instance goes out of scope, HeapWatcher will again start tracking allocations in the thread.

Test Fixtures

Two test fixtures are included with HeapWatcher and both are intended to ease the creation of multi-threaded unit test cases, which are useful for detecting race conditions or dead locks. The test fixtures feature the ability to add functions or lambdas for ‘workload functions’ and then start all of those ‘workload functions’ simultaneously. Alternatively, ‘workload functions’ may be given a random start delay in seconds (as a double so it may be fractions of a second as well). This permits stress testing with a lot of load started at one time or allows for load to ramp over time.

The SEFUtility::HeapWatcher::ScopedMultithreadedTestFixture class starts watching the heap on creation and takes a function or lambda which will be called with a HeapSnapshot when all threads have completed, to permit testing the final heap state. This test fixture effectively hides the HeapWatcher instructions whereas the SEFUtility::HeapWatcher::MultithreadedTestFixture class requires the user to wrap the test fixture with the HeapWatcher start and stop.

Examples of both test fixtures appear below. First is an example of MultithreadedTestFixture :

    SECTION("Torture Test, One Leak", "[basic]")
    {
        constexpr int64_t num_operations = 2000000;
        constexpr int NUM_WORKERS = 20;

        SEFUtility::HeapWatcher::MultithreadedTestFixture test_fixture;

        SEFUtility::HeapWatcher::get_heap_watcher().start_watching();

        test_fixture.add_workload(NUM_WORKERS,
                                  std::bind(&RandomHeapOperations, num_operations));  //  NOLINT(modernize-avoid-bind)
        test_fixture.add_workload(1, &OneLeak);

        std::this_thread::sleep_for(10s);

        test_fixture.start_workload();
        test_fixture.wait_for_completion();

        auto leaks = SEFUtility::HeapWatcher::get_heap_watcher().stop_watching();

        REQUIRE(leaks.open_allocations().size() == 1);
    }

An example of ScopedMultiThreadedTestFixture follows :

    SECTION("Two Workloads, Few Threads, one Leak", "[basic]")
    {
        constexpr int NUM_WORKERS = 5;

        SEFUtility::HeapWatcher::ScopedMultithreadedTestFixture test_fixture(
            [](const SEFUtility::HeapWatcher::HeapSnapshot& snapshot) { REQUIRE(snapshot.numberof_leaks() == 5); });

        test_fixture.add_workload(NUM_WORKERS, &BuildBigMap);
        test_fixture.add_workload(NUM_WORKERS, &OneLeak);

        std::this_thread::sleep_for(1s);

        test_fixture.start_workload();
    }

Conclusion

HeapWatcher and the multithreaded test fixture classes are intended to help developers create tests which check for memory leaks either in simple procedural test cases written with GoogleTest or Catch2 or in more complex multi-threaded tests in those same base frameworks.

https://github.com/stephanfr/HeapWatcher

Managing Privileges for Automated Raspberry Pi GPIO Testing

Many RPi libraries manipulate the GPIO pins by mapping various GPIO control memory blocks into the process address space. For GPIO input/output pins only, the Raspberry Pi OS kernel supports the /dev/gpiomem device which can be accessed from user space. For any other GPIO functions, such as setting up a PWM output, other memory blocks must be accessed through /dev/mem.

Typically, the base address of the desired control block is mapped into the process address space using the mmap command which takes a file descriptor for a /dev/mem device. User space processes cannot open the /dev/mem device, so a common workaround is to run the process as root using sudo. Additionally, GPIO ISR handling typically has much higher fidelity when the ISR dispatching thread runs at one of the ‘real-time’ thread schedules. This too requires elevated privileges.

For many use cases, like automated CI/CD running a test process under sudo is a less than optimal approach and certainly violates the ‘Principle of Least Privilege’. Typically, these kinds of impediments result in skipping automated testing -or- using workarounds like putting root passwords in response files.

Bluntly, there is no way to provide elevated privileges to a process without incurring some security risk and for clarity the approach described below is not strictly *secure* – I feel it is better and more constrained than most of the alternatives I have found. Certainly for hobbyists and individuals working on a benchtop, this is probably more than ‘good enough’.

Background

The RPi maps the GPIO controls into physical memory at 0x3F000000 for BCM2835 (Models 2 &3) and 0x7E200000 for BCM2711 (Model 4) based RPis. To do this, a snippet of code like the following is used :

constexpr uint32_t MAPPED_MEMORY_PROTECTION = PROT_READ | PROT_WRITE | PROT_EXEC;
constexpr uint32_t MAPPED_MEMORY_FLAGS = MAP_SHARED | MAP_LOCKED;

uint32_t peripheral_base = 0xFE000000;
uint32_t gpio_offset = 0x200000;
uint32_t gpio_block_size = 0xF4;

int dev_mem_fd = open("/dev/mem", O_RDWR | O_SYNC );
void*  gpios = mmap( nullptr, gpio_block_size, MAPPED_MEMORY_PROTECTION, MAPPED_MEMORY_FLAGS, dev_mem_fd, peripheral_base + gpio_offset );

The /dev/mem device cannot be opened if the process does not have the CAP_SYS_RAWIO capability. There are a lot of other operations that are permitted for processes with that capability – but an ability to map physical memory into a virtual address space opens up a whole plethora of potential compromises.

Unfortunately, without this privilege any app needing to mount /dev/mem will have to be run with sudo – which is difficult to manage in an automated pipeline or even when running unit tests within an IDE, like using Catch2 in VSCode.

Workaround

Linux permits capabilities to be assigned to files, so it is possible to provide the CAP_SYS_RAWIO capability to specific files – for instance the unit test app created by a makefile. To do this, the following will suffice:

sudo setcap cap_sys_rawio tests

However, every time the tests file is rebuilt, the capabilities must be re-assigned – so we have not really made much progress, there is still a need for the user to intervene and provide a root password after every build.

To workaround this, the interactive user could grant herself the CAP_SETFCAP capability and then the snippet above can be run without requiring sudo. Giving a process CAP_SETFCAP capability is just one small step away from simply running as root, so we should strive for something better.

It is possible to permit a user or group to execute commands with sudo but without requiring a password by adding entries to a sudoers file. In fact, this capability can be fairly tightly constrained to very specific command patterns. These files can be placed under /etc/sudoers.d/ and will be picked up by the sudo processor. An example appears below :

steve ALL=(root) NOPASSWD:  /sbin/setcap cap_sys_rawio+eip /home/sef/dev/unit_tests/tests
steve ALL=(root) NOPASSWD: !/sbin/setcap cap_sys_rawio+eip /home/sef/dev/unit_tests/tests*..*
steve ALL=(root) NOPASSWD: !/sbin/setcap cap_sys_rawio+eip /home/sef/dev/unit_tests/tests*[ ]*

In the example, the first line permits user steve to run /sbin/setcap cap_sys_rawio+eip /home/sef/dev/unit_tests/tests without having to supply a password. The next two lines have an exclamation point to negate the operation and effectively eliminate any permutations of the prior line which could be used to grant the capability to a different, unintended file.

This combination puts us in a place where any process running under steve can provide the CAP_SYS_RAWIO capability to only the /home/sef/dev/unit_tests/tests file without having to supply the root password. Clearly, if steve‘s account is compromised it would possible for someone to gain root – but the attacker would have to do a lot more work to get there if privileges had been provided indiscriminately or if the root password were placed in a response file.

Doing the above gets us close, but there is one more step needed. The /dev/mem file is owned by root and can only be accessed by root. Assigning capabilities granularly elevates privileges in the interactive process but that process is still not root. To resolve this final stumbling block, we can modify the ACL for /dev/mem to permit the interactive user to access it. An example of how to do this appears below :

sudo setfacl -m u:steve:rw /dev/mem

This command will not persist through reboots, but needs to be executed only once after a reboot. It would be possible to make this assignment persistent if desired.

Putting It All Together

The good news is that all of the above can be *mostly* automated as part of a CMake specification. Only two infrequent manual steps are required.

The following example uses a pair of template files and some CMake specifications to create a specialized sudoers file and a specialized shell script for setting the ACLs properly for /dev/mem. Peronally, I put the templates in the misc subdirectory of my unit tests folder and the CMakeLists.txt file is in the unit test folder itself. For the purposes of this example, the templates must simply be in the subdirectory misc of the directory holding the CMakeLists.txt file.

#
#   Allow setcap execute without a password only for the CAP_SYS_RAWIO capability on
#       the tests file.  The negative patterns are intended to reduce the risk of anything 
#       other than just 'tests' being modified
#
#   Copy the generated file with the variables replaced into the /etc/sudoers.d directory
#

$ENV{USER} ALL=(root) NOPASSWD:  /sbin/setcap cap_sys_rawio+eip ${CMAKE_CURRENT_BINARY_DIR}/tests
$ENV{USER} ALL=(root) NOPASSWD: !/sbin/setcap cap_sys_rawio+eip ${CMAKE_CURRENT_BINARY_DIR}/tests*..*
$ENV{USER} ALL=(root) NOPASSWD: !/sbin/setcap cap_sys_rawio+eip ${CMAKE_CURRENT_BINARY_DIR}/tests*[ ]*

Adding the following to the CMakeLists.txt file will generate the final sudoers file. The CMake file command copies the generated file back into the source directory next to the template whilst also setting the file permissions appropriately. After the file is generated, it must be manually copied with the right file permissions to the /etc/sudoers.d/ directory, as that operation requires root privilege.

configure_file( ./misc/020_setcap_rawio_on_test_app.in ${CMAKE_CURRENT_BINARY_DIR}/misc/020_setcap_rawio_on_test_app )
file( COPY ${CMAKE_CURRENT_BINARY_DIR}/misc/020_setcap_rawio_on_test_app
      DESTINATION ${CMAKE_CURRENT_SOURCE_DIR}/misc
      FILE_PERMISSIONS OWNER_READ GROUP_READ WORLD_READ )

Finally, adding the following to the CMakeLists.txt file will assign the CAP_SYS_RAWIO capability to the tests file every time it is generated.

add_custom_command(TARGET tests POST_BUILD
                   COMMAND sudo setcap cap_sys_rawio+eip ${CMAKE_CURRENT_BINARY_DIR}/tests)

To make the ACL assignment easier, a similar process is used. First, a template file which will be processed by CMake is needed :

#!/bin/bash
sudo setfacl -m u:$ENV{USER}:rw /dev/mem

Then, the right magic in CMakeLists.txt to process the template file :

configure_file( ./misc/set_devmem_acl.in ${CMAKE_CURRENT_BINARY_DIR}/misc/set_devmem_acl.sh )
file( COPY ${CMAKE_CURRENT_BINARY_DIR}/misc/set_devmem_acl.sh
      DESTINATION ${CMAKE_CURRENT_SOURCE_DIR}/misc
      FILE_PERMISSIONS OWNER_READ OWNER_WRITE OWNER_EXECUTE GROUP_READ GROUP_EXECUTE WORLD_READ WORLD_EXECUTE )

This will create a shell script with the proper substitutions for the interactive user. This script needs to be executed once per session which seems a reasonable compromise. Alternatively, the sudoers file could be enriched to permit the command to be executed without a password and then even the process of permitting the interactive user access to /dev/mem can be used in automated scripts.

Adding CAP_SYS_NICE

As mentioned in the introduction, ISRs servicing GPIO interrupts will typically need to run with realtime scheduling for reasonable performance. The main risk that concerns me is *missing interrupts* and beyond a couple kilohertz on an RPi4 it is easy to lose interrupts. Realtime scheduling in Linux can be applied at the thread level using pthread_setschedparam in something like the following:

if (realtime_scheduling_)
{
    struct sched_param thread_scheduling;

    thread_scheduling.sched_priority = 5;

    int result = pthread_setschedparam(pthread_self(), SCHED_FIFO, &thread_scheduling);

    if( result != 0 )
    {
        SPDLOG_ERROR( "Unable to set ISR Thread scheduling policy - file may need cap_sys_nice capability.  Error: {}", result );
    }
}

Using realtime scheduling is something of a risk as poorly designed code can starve the rest of the system, or perhaps more frequently a user looking for more responsivity can ‘nice’ their processes to the detriment of other processes. Therefore, the CAP_SYS_NICE capability is required to execute the above snippet.

The templates above can be enriched to include CAP_SYS_NICE, but there are a few details that *really matter*. The nastiest little complication is the difference in how the comma (i.e. ‘,’) is used by the setcap command and how the comma is interpreted in a sudoers file. In both cases it is a separator, to separate multiple capabilities for setcap and to separate different commands in the sudoers file. Therefore, within the setcap command in the sudoers file, the comma must be escaped with a backslash. The following is the template from above including the CAP_SYS_NICE capability.

#
#   Allow setcap execute without a password only for the CAP_SYS_RAWIO and CAP_SYS_NICE capabilities
#       on on the tests file.  The negative patterns are intended to reduce the risk of anything
#       other than just 'tests' being modified
#
#   Copy the generated file with the variables replaced into the /etc/sudoers.d directory
#

$ENV{USER} ALL=(root) NOPASSWD:  /sbin/setcap cap_sys_rawio\,cap_sys_nice+eip ${CMAKE_CURRENT_BINARY_DIR}/tests
$ENV{USER} ALL=(root) NOPASSWD: !/sbin/setcap cap_sys_rawio\,cap_sys_nice+eip ${CMAKE_CURRENT_BINARY_DIR}/tests*..*
$ENV{USER} ALL=(root) NOPASSWD: !/sbin/setcap cap_sys_rawio\,cap_sys_nice+eip ${CMAKE_CURRENT_BINARY_DIR}/tests*[ ]*

As shown above, the comma separating capabilities is escaped with a backslash. Similarly, the setcap command used to assign capabilities to the tests file will have to be modified in the CMakeLists.txt specification.

Conclusion

Hopefully the content in this post will help not only manage permissions necessary for developing GPIO applications on the RPi but also provide some insight into how CMake can be used to generate various kinds of files from templates for specific use cases. I use these in my CMake files in VSCode while developing remotely on RPi 3s and 4s and it is certainly a lot more fluid a development experience than having to enter the root password all the time.