Tag Archives: software

Basics of GCC Linker Scripts

Even if you have been using the GCC suite of compilers heavily for years, it is unlikely you have had to create a Linker Script. Linker Scripts are needed when fine-grained control over the memory layout of an executable is required. Most C/C++ code is compiled to an application or service for a specific OS platform, so memory layout is both pre-defined and generally pretty relaxed.

This is not the case for Bare Metal code. When developing for bare metal, the location of the entry point for the code and the locations of global statics, the stack and possibly the heap must be specified. There is no OS or OS Memory Model to be used. The Linker Script defines the foundation of a bare metal code memory model to be used in the output image.

What the Linker Does

The role of the Linker in creating an executable image is to take a collection of input files that contain ‘segments’ and ‘symbols’ and combine those ‘input segments’ into ‘output sections’ of the final image – while also determining the correct value for various unresolved symbols in the ‘input segments’. Additionally, symbols can be defined in a Linker Script and those symbols will be available to source code. Examples of that kind of symbol resolution appear in the example script.

‘Input segments’ are generated by the compilers or assemblers generating the object files linked together to form the output image. As you progress below, ‘segments’ are in object files and ‘sections’ are generated by the linker. Since the code for my bare metal Aarch64 OS is C/C++ (with a little assembly) the C/C++ Memory Model must be used.

Example Linker Script

Linker scripts use the LD Command Language. It is *mostly* specification, there are not if/then style conditionals, though it is possible to test if a symbol is defined. The only required element of a linker script is at least one SECTION. Sections describe the memory layout of the output binary. LD documentation may be found here.

Below is a linker script from a bare metal OS I have been tinkering with for the Aarch64 on the Raspberry Pi. It has a bit of complexity but is still simple enough to understand and either edit or extend for your needs.

As explained at the very top of the script, this is actually a template which is run through the C Preprocessor which then expands the preprocessor directives and generates the final script. The ‘os_memory_config.h‘ file contains the following:

#pragma once

#define STATIC_HEAP_SIZE_IN_BYTES 65536
#define DYNAMIC_HEAP_SIZE_IN_BYTES 65536

The advantage of running this template through the preprocessor is that the symbols STATIC_HEAP_SIZE_IN_BYTES and DYNAMIC_HEAP_SIZE_IN_BYTES are now shared in both the linker script and the C/C++ code base – at C/C++ compile time. It is possible to adjust the size of the heaps from a single file, instead of having to remember that there are two places that must be changed.

Inside the Linker Script

Basic LD Command Syntax

Numeric values in a linker script are all integers and C integer operations are permitted. Symbols may be defined in a linker script. Unquoted symbols follow the same rules as C symbols, but symbols may also be quoted – which permits the inclusion of spaces or perhaps reserved words in the symbol.

Probably the most important symbol is the dot ‘.‘ global symbol. The dot symbol represents the current memory location counter maintained by the linker as it is assembling the output image. It may be both read and set.

Semicolons are required after assignment statements and are permitted in other locations but are not required. If you deep dive and end up using ELF Program Headers, semicolons are required there as well.

Standard C block comments are permitted with /* */ delimiters.

Defining a Memory Block

The snippet above defines a memory block named OS_RAM of 32 megabytes in length, starting at the physical location 0x00080000 which may be read, written to an executed. This location is not an accident – it is the place where the RaspberryPi boot loader loads the OS image. There are additional attributes that can be specified for a memory block and are described in the GCC LD documentation for Memory Layout.

LD permits only a single MEMORY declaration but multiple blocks may be defined in the declaration. It is an optional declaration, if it does not exist, the linker assumes there is sufficient memory for the image.

Defining a Simple Memory Section

Above is the start of the script section specifications and a simple memory section called ‘start’ which is required to start on a 4 byte aligned memory address. The ‘.’ location counter is set to the next four byte aligned location with . = ALIGN(4) and is then read and assigned to the global variable __start with the __start = . statement.

At the end of the section specification, the > OS_RAM directive tells the linker to assign this section to the OS_RAM memory block defined previously in the script. As successive sections are assigned to this block, it will fill. If the size of the sections assigned to the block exceed the 32M size of the block, the linker will exit with an error.

Defining a Section as a Group of Compiler Defined Segments

The C and C++ compilers define code and/or data segments. A section in a linker script usually defines a collection of input segments that are to be grouped into a single section of memory in the output image. An example follows:

The .text section specification contains the KEEP statement in addition to a regular segment inclusion specification. KEEP is not documented in the GCC LD man pages (I have no idea why) but what it does is includes those segments into the linker section and marks them as ‘used’ even if they are not referenced anywhere else in the input object files. Unreferenced input segments will be eliminated as dead code by the linker, unless those segments as identified to be kept. In this case, we need to be sure the .text.boot segment is retained.

The .rodata section includes read only segments defined in the input object files.

The text segment of a C or C++ program is typically the object code to be executed. The C memory model is illustrated below and the different segments can be found in section declaration statements in the Linker Script.

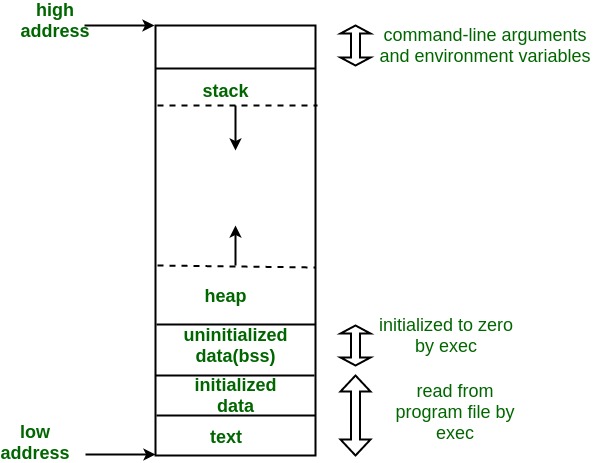
Borrowed from Geeks4Geeks – https://media.geeksforgeeks.org/wp-content/uploads/memoryLayoutC.jpg

The .rodata and .data linker sections are generally the ‘initialized data’ segment of the map.

Wildcards in Section Specifications

The example above contains a couple different uses of the ‘*’ asterisk as a wildcard. When specifying a segment from an input file be assigned to a segment, the actual syntax is ‘foo.o (.input1)‘ where ‘foo.o‘ is the name of an input object file and .input1 is a segment in ‘foo.o‘. If you know that you will have multiple input files with a .input1 segment, then the file specification can be replaced with a wildcard: ‘*(.input1)‘ – which specifies that any .input1 segment in any input file should be included in the output image.

Segment names may also be wildcarded. For example: ‘*(.input*)‘ specifies that any segment that starts with ‘.input‘ in any input file should be included in the output. In this case, segments .input1, .input2, .input345 will be assigned to the linker section. The linker handles wildcards much like the Unix shell with ‘?’ for single characters, ‘[chars]’ for membership and ‘-‘ for range (i.e. ‘[a-z]’).

C++ Static Variable Initialization

Given the object oriented nature of the C++, there needs to be a mechanism to initialize global class instances *before* program execution. In the Linker Script we see this in the .init_array section.

In the snippet above, memory is aligned to a 16 byte boundary before the .init_array section is declared. Then we insure we have 4 byte alignment (should be the case after the prior alignment anyway) and define the __init_array_start symbol as the current memory location. The .init_array segments from the input object code are then assigned to the segment and then a second symbol __init_array_end is set to the new value of the memory location counter.

The __init_array_start and __init_array_end symbols may be referenced in object code and will be linked into the output image. In the Aarch64 startup code, C++ globals are initialized as the last step before jumping to the start of the ‘kernel main’ function. The init array is just a list of void functions that initialize a global static when called. Therefore, all the assembly language does is starts with __init_array_start , gets a 4 byte address, jumps to it, and then moves to the next sequential address until __init_array_end is reached.

In the C memory map, the C++ intialization array is assigned to the ‘initialized data’ portion of the map.

The BSS Section

In the C memory map there is the ‘uninitialized data segment’ called ‘bss’ which is also referenced in the Linker Script. The bss segment is not initialized as the C++ globals are initialized above but the whole section must be set to zero. The relevant section of the Linker Script is below:

There is a similar pattern here. Align the program counter to a 4 byte boundary, set the __bss_start symbol to the current memory location, keep a couple other sections labelled ‘bss’ in the input files, align the current location counter to an 8 byte boundary so we can set double words in memory to zero and finally create the __bss_end symbol with the 8 byte aligned location. The __bss_size_in_double_words symbol is also computed in the linker script and can be referenced in code (example below).

The section is decorated with NOLOAD, which instructs the linker that there is no code or data to be placed in the output file for this part of the memory map. This makes sense for the .bss section – as it will all be explicitly set to zero in startup code. Another type of section that might be decorated with NOLOAD would be ROM which exists on the HW platform and can be referenced but does not need to be present in the image generated by the linker.

Aarch64 startup assembly language to zero out the .bss section:

Defining an Empty Section

Sometimes it is helpful to define an empty block of memory in the output memory map. The .static_heap section below does just that.

This section is aligned to a 4 byte boundary and then the __static_heap_start symbol is set to the current memory location and then the value of the STATIC_HEAP_SIZE_IN_BYTES symbol included from the .h file is added to the current location. After the location is advanced, the __static_heap_end is set to the current location. No input segments from the input files are assigned to the section and nothing is kept. This is just a chunk of memory. I guess it could be decorated with NOLOAD but since there are no input segments specified – there will be nothing to load anyway. Finally, the symbol __static_heap_size_in_bytes is computed for potential use in the code. Based on the location in the linker script, this heap will appear just after the bss section of the C memory map.

Final Interesting Bits

The Linker Script contains a couple more semi-duplicative sections which carve out memory for heaps and stacks. The need for two different stacks will be discussed in my post on Aarch64 bootstrapping code. The last part of the script that is worth mentioning is the DISCARD section.

The DISCARD section is a ‘reserved’ section which can be assigned input segments from the object code files and which will explicitly remove those segments from the output image. In the example above, anything in any .comment segment will be discarded by the linker and anything in any segment starting with .gnu or .note or .eh_frame will be dropped as well.

Adding the Linker Script to the Link Statement

The code snippet below shows the Makefile specification to process the Linker Script Template with the C Preprocessor, write that file to a new file and then use that new file when linking the output image.

There are a bunch of Makefile symbols above – but the key elements should be apparent.

Where to Find the Code

The Linker Script, Makefiles and source code can be found in my Github repository. I have a prior post on the Makefile design which may also be helpful.

Building GCC Plugins – Part 2: Introduction to GCC Internals

Once the basic scaffolding is in place for a GCC Plugin, the next step is to analyze and perhaps modify the Abstract Syntax Tree (AST) created by GCC as a result of parsing the source code.  GCC is truly a marvel of software engineering, it is the de-facto compiler for *nix environments and supports a variety of front ends for different langauages (even Ada…).  That said, the GCC AST is complex to navigate for a number of reasons.  First, parsing and representing a variety of languages in a common syntax tree is a complex problem so the solution is going to be complex.  Second, history – looking at the GCC internals is a bit like walking down memory lane; this is the way we wrote high-performance software when systems had limited memory (think 64k) and CPUs had low throughput (think 16Mhz clock cycles).  Prior to GCC 4.8.0, GCC was compiled with the C compiler, so don’t bother looking for C++ constructs in the source code.

The AST Tree

The primary element in the GCC AST is the ‘tree’ structure.  An introduction to the tree structure appears in the GCC Internals Documentation.  Figure 1 is extracted from the tree.h header file and provides a good starting place for a discussion of the GCC tree and how to approach programming with it.

[sourcecode language=”c”]

union GTY ((ptr_alias (union lang_tree_node),
desc ("tree_node_structure (&%h)"), variable_size)) tree_node {
struct tree_base GTY ((tag ("TS_BASE"))) base;
struct tree_typed GTY ((tag ("TS_TYPED"))) typed;
struct tree_common GTY ((tag ("TS_COMMON"))) common;
struct tree_int_cst GTY ((tag ("TS_INT_CST"))) int_cst;
struct tree_real_cst GTY ((tag ("TS_REAL_CST"))) real_cst;
struct tree_fixed_cst GTY ((tag ("TS_FIXED_CST"))) fixed_cst;
struct tree_vector GTY ((tag ("TS_VECTOR"))) vector;
struct tree_string GTY ((tag ("TS_STRING"))) string;
struct tree_complex GTY ((tag ("TS_COMPLEX"))) complex;
struct tree_identifier GTY ((tag ("TS_IDENTIFIER"))) identifier;
struct tree_decl_minimal GTY((tag ("TS_DECL_MINIMAL"))) decl_minimal;
struct tree_decl_common GTY ((tag ("TS_DECL_COMMON"))) decl_common;
struct tree_decl_with_rtl GTY ((tag ("TS_DECL_WRTL"))) decl_with_rtl;
struct tree_decl_non_common GTY ((tag ("TS_DECL_NON_COMMON"))) decl_non_common;
struct tree_parm_decl GTY ((tag ("TS_PARM_DECL"))) parm_decl;
struct tree_decl_with_vis GTY ((tag ("TS_DECL_WITH_VIS"))) decl_with_vis;
struct tree_var_decl GTY ((tag ("TS_VAR_DECL"))) var_decl;
struct tree_field_decl GTY ((tag ("TS_FIELD_DECL"))) field_decl;
struct tree_label_decl GTY ((tag ("TS_LABEL_DECL"))) label_decl;
struct tree_result_decl GTY ((tag ("TS_RESULT_DECL"))) result_decl;
struct tree_const_decl GTY ((tag ("TS_CONST_DECL"))) const_decl;
struct tree_type_decl GTY ((tag ("TS_TYPE_DECL"))) type_decl;
struct tree_function_decl GTY ((tag ("TS_FUNCTION_DECL"))) function_decl;
struct tree_translation_unit_decl GTY ((tag ("TS_TRANSLATION_UNIT_DECL")))
translation_unit_decl;
struct tree_type_common GTY ((tag ("TS_TYPE_COMMON"))) type_common;
struct tree_type_with_lang_specific GTY ((tag ("TS_TYPE_WITH_LANG_SPECIFIC")))
type_with_lang_specific;
struct tree_type_non_common GTY ((tag ("TS_TYPE_NON_COMMON")))
type_non_common;
struct tree_list GTY ((tag ("TS_LIST"))) list;
struct tree_vec GTY ((tag ("TS_VEC"))) vec;
struct tree_exp GTY ((tag ("TS_EXP"))) exp;
struct tree_ssa_name GTY ((tag ("TS_SSA_NAME"))) ssa_name;
struct tree_block GTY ((tag ("TS_BLOCK"))) block;
struct tree_binfo GTY ((tag ("TS_BINFO"))) binfo;
struct tree_statement_list GTY ((tag ("TS_STATEMENT_LIST"))) stmt_list;
struct tree_constructor GTY ((tag ("TS_CONSTRUCTOR"))) constructor;
struct tree_omp_clause GTY ((tag ("TS_OMP_CLAUSE"))) omp_clause;
struct tree_optimization_option GTY ((tag ("TS_OPTIMIZATION"))) optimization;
struct tree_target_option GTY ((tag ("TS_TARGET_OPTION"))) target_option;
};

[/sourcecode]

Figure 1: The tree_node structure extracted from the GCC code base.

Fundamentally, a tree_node is a big union of structs.  The union contains a handful of common or descriptive members, but the majority of union members are specific types of tree nodes.  The first tree union member: tree_base is common to all tree nodes and provides the basic descriptive information about the node to permit one to determine the precise kind of node being examined or manipulated.  There is a bit of an inheritance model introduced with tree_base being the foundation and tree_typed and tree_common adding another layer of customization for specific categories of tree nodes to inherit but from there on out the remainder of the union members are specific types of tree nodes.  For example, tree_int_cst is an integer constant node whereas tree_field_decl is a field declaration.

Tree nodes are typed but not in the C language sense of ‘typed’.  One way to think about it is that the tree_node structure is a memory-efficient way to model a class in C prior to C++.  Instead of member functions or methods, there is a large library of macros which act on tree nodes.  In general, macros will fall into two categories: predicate macros which will usually have a ‘_P’ suffix and return a value which can be compared to zero to indicate a false result and transformation macros which take a tree node and usually return another tree node.  Despite the temtpation to dip directly into the public tree_node structure and access or modify the data members directly – don’t do it.  Treat tree nodes like a C++ classes in which all the data members are private and rely on the tree macros to query or manipulate tree nodes.

Relying on the macros to work with the tree_node structure is the correct approach per GCC documentation but will also simply make your life easier.  GCC tree_node structures are ‘strongly typed’ in the sense that they are distinct in the GCC tree type-system and many of the macros expect a specific tree_node type.  For example the INT_CST_LT(A, B) macro expects to have two tree_int_cst nodes passed as arguments – even though the C++ compiler cannot enforce the typing at compile time.  If you pass in the wrong  tree_node type, you will typically get a segmentation violation.  An alternative approach is to compile GCC with the –enable-checking flag set which will enforce runtime checking of node types.

In terms of history, this type of modelling was common back in the day when machines were limited in memory and compute cycles.  This approach is very efficient in terms of memory as the union overlays all the types and there are no virtual tables or other C++ class overhead that consumes memory or requires compute overhead.  The price paid though is that it is 100% incumbent on the developer to keep the type-system front-of-mind and insure that they are invoking the right macros with the right arguments.  The strategy of relying on the compiler to advise one about type mis-matches does not work in this kind of code.

Basics of AST Programming

There are 5 key macros that can be invoked safely on any tree structure.  These three are: TREE_CODE, TREE_TYPE, TREE_CHAIN, TYPE_P and DECL_P.  In general after obtaining a ‘generic’ tree node, the first step is to use the TREE_CODE macro to determine the ‘type’ (in the GCC type-system) of the node.  The TREE_TYPE macro returns the source code ‘type’ associated with the node.  For example, the node result type of a method declaration returning an interger value will have a TREE_TYPE with a TREE_CODE equal to INTEGER_TYPE.  The code for that statement would look like:

[sourcecode language=”c” wraplines=”false”]

TREE_CODE( TREE_TYPE( DECL_RESULT( <em>methodNode</em> ))) == INTEGER_TYPE

[/sourcecode]

Within the AST structure, lists are generally represented as singly-linked lists with the link to the next list member returned by the TREE_CHAIN macro.  For example, the DECL_ARGUMENTS macro will return a pointer to the first parameter for a function or method.  If this value is NULL_TREE, then there are no parameters, otherwise the tree node for the first parameter is returned.  Using TREE_CHAIN on that node will return NULL_TREE if it is the only parameter or will return a tree instance for the next parameter.  There also exists a vector data structure within GCC and it is accessed using a different set of macros.

The TYPE_P and DECL_P macros are predicates which will return non-zero values if the tree passed as an argument is a type specification or a code declaration.  Knowing this distinction is important as it then quickly partitions the macros which can be used with node.  Many macros will have a prefix of ‘TYPE_’ for type nodes and ‘DECL_’ for declaration nodes.  Frequently there will be two sets of identical macros, for instance TYPE_UID will return the GCC generated, internal numeric unique identifier for a type node whereas DECL_UID is needed for a declaration node.  In general, I have found that calling a TYPE_ macro on a declaration or a DECL_ macro on a type specification will result in a segmentation violation.

Other frequently used macros include: DECL_NAME and TYPE_NAME to return a tree node that contains the source code name for a given element.  IDENTIFIER_POINTER can then be used on that tree to return a pointer to the char* for the name.  DECL_SOURCE_FILE, DECL_SOURCE_LINE and DECL_SOURCE_LOCATION are available to map an AST declaration back to the source code location.  As mentioned above, DECL_UID and TYPE_UID return numeric unique identifiers for elements in the source code.

In addition to the above, for C++ source code fed to g++, the compiler will inject methods and  fields not explicitly declared in the c++ source code.  These elements can be identified with the DECL_IS_BUILTIN and DECL_ARTIFICIAL macros.  If as you traverse the AST you trip across oddly named elements, check the node with those macros to determine if the nodes have been created by the compiler.

Beyond this simple introduction, sifting through the AST will require a lot of time reviewing the tree.h and other header files to look for macros that you will useful for your application.  Fortunately, the naming is very consistent and quite good which eases the hunt for the right macro.  Once you think you have the right macro for a given task, try it in your plugin and see if you get the desired result.  Be prepared for a lot of trial-and-error investigation in the debugger.  Also, though there are some GDB scripts to pretty-print AST tree instances, looking at these structure in the debugger will also require some experience, as again the debugger isn’t able to infer much about GCC’s internal type system.

Making the AST Easier to Navigate and Manipulate

I have started a handful of C++ libraries which bridge the gap between the implicit type system in the GCC tree_node structure and explicit C++ classes modelling distinct tree_node types.  For example, a snippet from my TypeTree class appears below in Figure 2.

[sourcecode language=”c” wraplines=”false”]

class TypeTree : public DeclOrTypeBaseTree
{
public :

TypeTree( const tree& typeTree )
: DeclOrTypeBaseTree( typeTree )
{
assert( TYPE_P( typeTree ) );
}

TypeTree& operator= ( const tree& typeTree )
{
assert( TYPE_P( typeTree ) );

(tree&)m_tree = typeTree;

return( *this );
}

const CPPModel::UID UID() const
{
return( CPPModel::UID( TYPE_UID( TYPE_MAIN_VARIANT( m_tree ) ), CPPModel::UID::UIDType::TYPE ) );
}

const std::string Namespace() const;

std::unique_ptr<const CPPModel::Type> type( const CPPModel::ASTDictionary& dictionary ) const;

CPPModel::TypeInfo::Specifier typeSpecifier() const;

CPPModel::ConstListPtr<CPPModel::Attribute> attributes();
};
[/sourcecode]

Figure 2: TypeTree wrapper class for GCC tree_node.

Within this library I make extensive use of the STL, Boost libraries and a number of C++ 11 features.  For example, ConstListPtr<> is a template alias for a std::unique_ptr to a boost::ptr_list class.

[sourcecode language=”c” wraplines=”false”]

template <class T> using ListPtr = std::unique_ptr<boost::ptr_list<T>>;
template <class T> using ConstListPtr = std::unique_ptr<const boost::ptr_list<T>>;

template <class T> using ListRef = const boost::ptr_list<T>&;

template <class T> ConstListPtr<T> MakeConst( ListPtr<T>& nonConstList ) { return( ConstListPtr<T>( std::move( nonConstList ) ) ); }

[/sourcecode]

Figure 3: Template aliases for lists.

At present the library is capable of walking through the GCC AST and creating a dictionary of all the types in the code being compiled.  Within this dictionary, the library is also able to provide detailed information on classes, structs, unions, functions and global variables.  It will scrape out C++ 11 generalized attributes on many source code elements (not all of the yet though) and return proper declarations with parameters and return types for functions and methods.  The ASTDictionary and the specific language model classes have no dependency on GCC Internals themselves.

The approach I followed for developing the library thus far was to get enough simple code running using the GCC macros that I could then start to refactor into C++ classes.  Along the way, I used Boost strong typedefs to start making sense of the GCC type system at compile time.  Once the puzzle pieces started falling into place and the programming patterns took shape, developing a plugin on top of the libraries is fairly straightforward.  That said, there is a long and painful learning curve associated with GCC internals and the AST itself.

Getting the Code and Disclaimers

The library code is available on Github: ‘stephanfr/GCCPlugin’.  All of the code is under GPL V3.0 which is absolutely required as it runs within GCC itself.  I do not claim that the library is complete, stable, usable or rational – but hopefully some will find it useful if for nothing more than providing some insight into the GCC AST.  For the record, this is not my job nor is it my job to enrich or bug fix the library so you can get your compiler theory class project done in time.  That said, if you pick up the code and either enrich it or fix some bugs – please return the code to me and I will merge what makes sense.

The code should ‘just run’ if you have a GCC Plugin build environment configured per my prior posts.  One detail is that the ‘GCCPlugin Debug.launch’ file will need to be moved to the ‘.launches’ directory of Eclipse’s ‘org.eclipse.debug.core’ plugin directory.  If the ‘.launches’ directory does not exist, then create it.

Creating an OpenStack Keystone ‘HelloWorld’ Extension

The OpenStack ‘cloud operating system’ provides a model, framework and  a core set of platform services managing core virtualized datacenter resources.  As of the Folsom release, the following services are packaged as part of the solution:

  • Keystone – Identity, Authentication and Authorization
  • Glance – Image Management
  • Nova – Compute
  • Quantum – Network
  • Swift – Object Storage
  • Cinder – Block Storage
  • Horizon – Web App Dashboard

Development of OpenStack is a collaborative venture between a global community of individuals and organizations.  Given the loosely coupled, standards based approach to development, a systems architecture composed of loosely coupled services adhering to a standardized API specification was needed to permit the project to move forward rapidly with a minimum of centralized coordination.

One of the core elements of the OpenStack architecture is support for extensibility.  The evolution of OpenStack will in part be governed by the development of experimental extensions to the base platform which may be promoted to first-class members of the platform should the extension prove generally valuable.  Beyond that, extensibility is needed to permit ‘customization’ of a base OpenStack package for specific deployment configurations or service requirements.

Though the Extension API has some sparse documentation on the OpenStack.org site, there don’t yet appear to be any simple ‘Hello World’ type examples for adding an extension to the Keystone service.  The process is not difficult but it took me some poking around in the code to figure out how to add one of my own.

Development Environment :

I use the DevStack distribution installed on an Ubuntu 12.04 Server OS for development.  In the absence of intrusive network proxies or firewalls, the DevStack distribution ‘just works’.  That said, DevStack is neither intended nor suitable for production deployments.  Be sure to read the DevStack caveats before you start using it so that you minimize potentially unpleasant surprises

Creating an Extension :

Step 1: Create subdirectory under ‘contrib’

For a vanilla DevStack installation, the solution root directory is ‘/opt/stack’.  Keystone extensions are typically placed in individual subdirectories of ‘/opt/stack/keystone/keystone/contrib’.  For this example create a directory named ‘hello_world’.

Step 2: Create a core.py file for the extension mapper and controller

The OpenStack extension architecture relies on the wsgi python framework.  There are some OpenStack wrapper classes that simplify creating an extension.  The code should be placed in the ‘contrib’ directory.  The python code for the hello_world extension appears below.

[sourcecode language=”python” wraplines=”false” collapse=”false”]
# vim: tabstop=4 shiftwidth=4 softtabstop=4

# Licensed under the Apache License, Version 2.0 (the "License"); you may
# not use this file except in compliance with the License. You may obtain
# a copy of the License at
#
# http://www.apache.org/licenses/LICENSE-2.0
#
# Unless required by applicable law or agreed to in writing, software
# distributed under the License is distributed on an "AS IS" BASIS, WITHOUT
# WARRANTIES OR CONDITIONS OF ANY KIND, either express or implied. See the
# License for the specific language governing permissions and limitations
# under the License.

from keystone.common import wsgi

from keystone import identity
from keystone import token

class HelloWorldExtension(wsgi.ExtensionRouter):

def add_routes(self, mapper):
controller = HelloWorldController()

mapper.connect( ‘/example/hello_world’,
controller=controller,
action=’get_hello_world’,
conditions=dict(method=[‘GET’]))

mapper.connect( ‘/example/hello_world/{identifier}’,
controller=controller,
action=’get_hello_world_with_id’,
conditions=dict(method=[‘GET’]))

class HelloWorldController(wsgi.Application):

def __init__(self):
self.token_api = token.Manager()
super(HelloWorldController, self).__init__()

def get_hello_world(self, context):
# self.assert_admin(context)
return {
‘SEF-EXAMPLE:hello_world’: [
{
‘hello’: ‘world’,
‘description’: ‘Simple Hello World Keystone Extension’,
},
]
}

def get_hello_world_with_id(self, context, identifier):
# self.assert_admin(context)
return {
‘SEF-EXAMPLE:hello_world_id’: [
{
‘hello’: ‘world’,
‘description’: ‘Simple Hello World Keystone Extension with Identifier’,
‘identifier’: identifier,
},
]
}
[/sourcecode]

The code is fairly straightforward.  The HelloWorldExtension class creates a controller an in the add_routes() method it associates URLs with code handlers.  The code handlers are defined in the HelloWorldController class.

There are two elements of the controller that merit a bit of explanation.  First, the example contains the commented out command: ‘self.assert_admin(context)’ in both code handlers. This command enforces authentication for the extension. It is commented out in the example to make the example easier to invoke with curl. Second, in the mapper the connection: “mapper.connect( ‘/example/hello_world/{identifier}'” specifies ‘{identifier}’ as an argument to the handler. The handler signature: ‘def get_hello_world_with_id(self, context, identifier)’ includes ‘identifier’ as the parameter parsed from the URL.

There are formalized naming conventions for extensions and their namespaces described in the OpenStack documentation.  For anything more than a HelloWorld example, these conventions should be followed.

Step 3: Create __init__.py to load the extension

The ‘__init__.py’ file below should be placed in the  ‘contrib’ subdirectory with the extension code. The file is very straightforward, it just loads the extension.

[sourcecode language=”python” wraplines=”false” collapse=”false”]

# vim: tabstop=4 shiftwidth=4 softtabstop=4
# Licensed under the Apache License, Version 2.0 (the "License"); you may
# not use this file except in compliance with the License. You may obtain
# a copy of the License at
#
# http://www.apache.org/licenses/LICENSE-2.0
#
# Unless required by applicable law or agreed to in writing, software
# distributed under the License is distributed on an "AS IS" BASIS, WITHOUT
# WARRANTIES OR CONDITIONS OF ANY KIND, either express or implied. See the
# License for the specific language governing permissions and limitations
# under the License.

from keystone.contrib.hello_world.core import *

[/sourcecode]

Step 4: Add an entry for the extension filter in keystone.conf

With the extension created and the ‘__init__.py’ file to load it, the next step is to modify the keystone configuration file to add a filter entry for the extension and then add the filter to the admin API pipeline.  For a standard OpenStack install, this would be the ‘/etc/keystone/keystone.conf’ file.  For DevStack, modifications should be made to the ‘/opt/stack/keystone/etc/keystone.conf.sample’ file which serves as a template for the ‘keystone.conf’ file generated during DevStack start-up.  The content to be added to the configuration file appears below:

[sourcecode language=”text” wraplines=”false” collapse=”false”]

[filter:hello_world_extension]
paste.filter_factory = keystone.contrib.hello_world:HelloWorldExtension.factory

[pipeline:admin_api]
pipeline = access_log sizelimit stats_monitoring url_normalize token_auth admin_token_auth xml_body json_body debug stats_reporting ec2_extension s3_extension crud_extension hello_world_extension admin_service

[/sourcecode]

The ‘[filter:hello_world_extension]’ should be added to the end of the list of filters in the configuration file.  The ‘[pipeline:admin_api]’ should already exist in the file, so all that is necessary for that line should be to add the name of the filter to the pipeline.

Step 5: Add self.extensions entry to controllers.py

Extensions are not self-describing so when querying an OpenStack Keystone instance for the extensions it has loaded, it is necessary to add the descriptive metadata to the ‘controllers.py’ class.  For DevStack, this file can be found at ‘/opt/stack/keystone/keystone/controllers.py’.  The code fragment below should be inserted in to the ‘__init__()’ method.

[sourcecode language=”text”]

self.extensions[‘SEF-HELLO-WORLD’] = {
‘name’: ‘Hello World Example Extension’,
‘namespace’: ‘http://docs.openstack.org/identity/api/ext/&#8217;
‘SEF-HELLO-WORLD/v1.0’,
‘alias’: ‘SEF-HELLO-WORLD’,
‘updated’: ‘2013-03-18T13:25:27-06:00’,
‘description’: ‘Openstack extensions to Keystone v2.0 API ‘
‘enabling Admin Operations.’,
‘links’: [
{
‘rel’: ‘describedby’,
‘type’: ‘text/html’,
‘href’: ‘https://github.com/openstack/identity-api&#8217;,
}
]
}

[/sourcecode]

Step 6: Check Extension Functionality

If you are using DevStack, the easiest thing to do is to restart it and it will compile and load the new extension. After it has started, there should be two new files: ‘core.pyc’ and ‘__init__.pyc’ in the ‘contrib/hello_world/’ subdirectory. Files with ‘.pyc’ extensions are ‘compiled python’ files which contains python byte code. To check the new extension description, use the following ‘curl’ command and you should see the description in the response:

[sourcecode language=”text”]

$ curl http://<em>openstack_ip_addr</em&gt;:35357/v2.0/extensions

{"extensions": {"values": [{"updated": "2013-03-18T13:25:27-06:00", "name": "Hello World Example Extension", "links": [{"href": "https://github.com/openstack/identity-api&quot;, "type": "text/html", "rel": "describedby"}], "namespace": "http://docs.openstack.org/identity/api/ext/SEF-HELLO-WORLD/v1.0&quot;, "alias": "SEF-HELLO-WORLD", "description": "Openstack extensions to Keystone v2.0 API enabling Admin Operations."}}

[/sourcecode]

To actually invoke the extension, use the following for the two non-authenticated operations:

[sourcecode language=”text”]
$ curl http://<em>openstack_ip_addr</em&gt;:35357/v2.0/example/hello_world

{"SEF-EXAMPLE:hello_world": [{"hello": "world", "description": "Simple Hello World Keystone Extension"}]}

$ curl http://<em>openstack_ip_addr</em&gt;:35357/v2.0/example/hello_world/token

{"SEF-EXAMPLE:hello_world_id": [{"identifier": "token", "hello": "world", "description": "Simple Hello World Keystone Extension with Identifier"}]}

[/sourcecode]

Note in the second example that the URL parameter ‘token’ has been passed to the extension handler as the ‘{identifier}’.

Conclusion:

The above gets you going with a Keystone extension, at least for Folsom.  Given the rate at which OpenStack is evolving, it is quite possible that the extension framework may well change in an upcoming release.  One nice enhancement would be to make extensions self-describing which would eliminate the need to add that descriptive meta-data to the ‘controllers.py’ file.